


Small Problems That Read as Neglect: What Sellers Overlook Before Listing
Each small problem usually costs little to fix, but together they tell a buyer the house has not been looked after. Three places to look.
Each small problem usually costs little to fix, but together these problems tell a buyer the house has not been looked after. This invites a closer look at everything else.
Here are three places to look.
Deferred maintenance
Why it matters: These issues show up at showings and in the inspection report, where each one becomes a line item a buyer can use to negotiate.
What to do:
- Walk through room by room with a notepad. List every sticky door, dripping faucet, running toilet, loose handrail, cracked outlet cover and burned-out bulb.
- For recurring issues, find the root cause first. A dripping faucet may need a new cartridge. A door that sticks may point to humidity or settling. Fix the cause, then make the adjustment or repair to the damaged area.
- Handle the simple items yourself and use a licensed tradesperson for plumbing or electrical work that calls for one.
- Finish the list before photos.
What not to do:
- Do not use temporary fixes such as tape or a dab of caulk over a leak.
- Do not take on electrical or plumbing work beyond your skill. Poor work can become a safety issue, and it raises bigger questions than the original problem would.
- Do not wait for the inspector to make the list for you.
Safety items
Why it matters: Safety items are quick for an inspector to check and easy for a buyer to notice, and a missing or failed item can end up in the inspection report. One often overlooked issue is smoke or carbon monoxide alarms. In the State of Washington, the seller of an owner-occupied single-family home must install carbon monoxide alarms before the buyer moves in, so check the rules for your home and ask your agent about smoke alarms and additional local requirements.
What to do:
- Check that smoke and carbon monoxide alarms are present and working.
- Look at the date printed on each unit.
- Test GFCI outlets near water with the test and reset buttons.
- Check that handrails are solid, and look for trip hazards on steps and walkways.
- If something fails, find out why before replacing it. A GFCI that will not reset may point to a wiring or moisture problem. A chirping alarm may need only a new battery or may be past its life. Have a licensed electrician look at anything electrical you cannot explain, and keep the receipt.
What not to do:
- Do not remove an alarm to stop it from chirping.
- Do not replace a failed GFCI with a standard outlet.
- Do not paint over or cover alarms.
Roof, exterior, decks and porches
Inspectors check all of these, and moss, lifted shingles, rotted trim and wobbly railings often turn into repair requests. Find the cause (an overflowing gutter, a leak, failed flashing) before you repair, and get a written estimate for anything you cannot finish: [link: roof and exterior maintenance post].
If something turns up, we can help
As agents we work with contractors and other vendors regularly, and we can share names from our experience and help you compare bids. You always choose who to hire. A broker should not require you to use their vendor, and should not be paid by a vendor you hire.
From Our Own Experience
A buyer inspected a charming older home in a Seattle neighborhood. During the inspection it was determined that the grounded outlets were not in fact grounded. The home had been built before grounded outlets were required, and there were no ground wires within the walls to ground those outlets correctly.
Whether the seller understood the nature of the safety issue or not, it was up to us to help the buyer understand what the potential impacts could be. In the end, the buyers decided they would be upgrading the electrical systems in the home to provide for air conditioning and additional capacity, so they weren’t hung up on having the seller fix the issue for them and proceeded with the sale with an understanding of what they were getting into.
Thinking about buying or selling in the Seattle Area?
Kelly Azzarello Real Estate | Compass
Email: kelly@kellyazzarello.com
Phone: (425) 830-6457
Web: www.kellyazzarello.com
Instagram: instagram.com/kellyazzarello
YouTube: youtube.com/kellyazzarellorealestate
This post is general information about real estate topics. It is not legal, tax or financial advice, and it does not replace a professional inspection. Rules and practices differ by situation and change over time. Check current requirements and talk with a licensed professional, such as an inspector, contractor, attorney or CPA, about your own property.

Water and Moisture: What Sellers Overlook Before Listing
Water leads to rot, mold and structural damage, and buyers know it. Here are three areas to check, and what to do and not do.
Water is what inspectors and buyers worry about most, because it leads to rot, mold and structural damage. Three areas to check before you list.
Moisture, drainage and signs of past water
Why it matters: Water shows up at the pre-inspection, where moisture readings, stains and smells get noted, and at the first showing, where a stain or a musty smell makes buyers wonder what else is wrong. Even if you don’t notice it, the buyer’s inspector likely will, and then it will be harder to react without additional stress and cost.
What to do if you suspect or find an issue:
- Find the source first. Check that gutters are clear, that downspouts carry water away from the house, and that the ground slopes away from the foundation. Inside, trace ceiling stains, musty smells, bubbling paint and warped baseboards back to a roof leak, a plumbing leak, condensation or a drainage problem.
- Then fix the cause. Clear or repair gutters, extend downspouts, rebuild the slope at the foundation, or repair the leak. Use a licensed tradesperson where the work calls for one, and keep the receipt.
- Then repair the damage. Replace wet drywall or trim, let the area dry completely, and paint.
- If the cause cannot be fully fixed before listing, get a written estimate from a qualified contractor so the issue can be disclosed. If a buyer asks about it, you can quickly show that the issue is understood and a fix is planned.
What not to do:
- Do not paint over a water stain without fixing the cause. Fresh paint over a stain makes buyers and inspectors suspicious, and the stain usually comes back.
- Do not hide damage behind furniture or stored items.
- Do not leave a known water problem out of your disclosures.
Attics and crawl spaces
Both collect moisture, pests and aging insulation that nobody sees day to day, and inspectors go into both. A crawl space inspection is our number one recommendation before listing: [link: crawl space post].
Trees and plants near the house
Branches and dense plants against the house give rodents a path to the roof and attic, hide what is behind them, and can damage siding. Cut them back from the siding, roofline and foundation, and have a sewer scope done if roots are a concern: [link: sewer scope post].
If something turns up, we can help
As agents we work with contractors and other vendors regularly, and we can share names from our experience and help you compare bids. You always choose who to hire. A broker should not require you to use their vendor, and should not be paid by a vendor you hire.
From Our Own Experience
One of our earliest transactions was for a small, starter home. During the showings and inspection period we noticed that the front yard was “mushy” and we suspected there might be water issues.
Then came a dry period and the lawn firmed up. A day before closing, we had a hard rainstorm and went to inspect the property just to be safe. It looked like there was a moat around the front of the house.
When a neighbor walked by we asked if this was a regular issue, and the neighbor said: “Every time it rains hard.”
Since it was an obvious issue that had not been part of the seller disclosure, we immediately contacted the seller’s agent with the information, photos, and related the conversation with the neighbor. They quickly contacted the seller, and we were able to discuss alternatives and have the issue resolved (at the seller’s cost).
Thinking about buying or selling in the Seattle Area?
Kelly Azzarello Real Estate | Compass
Email: kelly@kellyazzarello.com
Phone: (425) 830-6457
Web: www.kellyazzarello.com
Instagram: instagram.com/kellyazzarello
YouTube: youtube.com/kellyazzarellorealestate
This post is general information about real estate topics. It is not legal, tax or financial advice, and it does not replace a professional inspection. Rules and practices differ by situation and change over time. Check current requirements and talk with a licensed professional, such as an inspector, contractor, attorney or CPA, about your own property.

The Number One Thing We Recommend Before You List: Inspect the Crawlspace
The crawlspace is where moisture, pests and failing insulation build up unseen, and a buyer's inspector will check. Here is what to look for and what to do first.
Why the crawlspace is first
The crawlspace is the part of the house nobody looks at, and it is where moisture, pests and failing insulation tend to build up quietly. Buyers' inspectors go in. What they find there can reshape a negotiation, and the fixes can be larger than a seller expects. Finding it first gives you time and options.
What to look for
Standing water, damp soil or a musty smell.
Missing, torn or displaced vapor barrier over the soil.
Wet, sagging or missing insulation.
Blocked or damaged vents.
Signs of pests, such as droppings or chewed material.
Plumbing leaks or stains on the subfloor and framing.
Rot or damage to wood framing.
What to do
Have the space looked at, by you if you are comfortable and it is safe, or by a qualified professional.
Find the cause of any moisture first, such as a leak or drainage problem, and fix it.
Then repair the damage: insulation, vapor barrier and vents, with licensed professionals for pest and plumbing work.
If it cannot be fully fixed before listing, get a written estimate so it can be disclosed and priced.
Keep receipts and reports.
What not to do
Do not add new insulation over a leak or damp area.
Do not seal vents or cover problems.
Do not skip it because nobody has looked in years.
For more detail, read [link: The crawl space and attic nobody has checked in years].
From Our Own Experience
In the Pacific Northwest, crawlspaces are often beneath the entire home. This gives you more to inspect, and more to repair. We also have more damp weather, which can translate into higher moisture levels in these locations. While these are easily managed, they are often ignored for years at a time: “What I can’t see can’t hurt me, right?”
In nearly every case that we list a home we highly recommend having the crawlspace (and attic) inspected. Having this done earlier rather than later will help you identify a vendor, get multiple quotes, and schedule the work at a time that is convenient for you.
In some cases, such as a sudden leak, insurance may help offset the cost of the work. Maintenance and long-term wear are usually not covered, so ask your insurer.
Very close to home, we listed a family member’s home a few years ago. Even though she had the entire crawlspace cleaned and reinsulated a few years earlier when her kitchen was remodeled, upon having a pre-inspection before her home went on the market we discovered pests had again invaded her crawlspace.
Fortunately:
- She was aware from previous experience what to expect.
- She relied on us to help her find a vendor that could do the work quickly and without inflated “emergency” pricing.
- We negotiated a transferable warranty with the vendor, so it could be passed on to the buyer.
If this had been a buyer’s inspection, she may have been unable to react quickly and get the work done, costing her both time and money.
Thinking about selling in The Seattle Area?
Kelly Azzarello Real Estate | Compass
kelly@kellyazzarello.com | (425) 830-6457
Instagram: instagram.com/kellyazzarello
YouTube: youtube.com/kellyazzarellorealestate
Disclaimer
This post is general information about real estate topics. It is not legal, tax or financial advice, and it does not replace a professional inspection. Rules and practices differ by situation and change over time. Check current requirements and talk with a licensed professional, such as an inspector, contractor, attorney or CPA, about your own property.

What Improvements Should I Make Before Selling? What Adds Price, Value and Sellability?
Price, value and sellability are three different goals. Here is what to fix first, what to freshen next, which larger projects to weigh carefully, and what to skip.Three different goals
Sellers often ask what improvements "add value," but there are three separate goals, and the best project for one may not help the others.
· Price: raising what buyers are willing to pay.
· Value: what an appraiser will support, which depends on condition, features and comparable sales.
· Sellability: how many buyers will want the home and how quickly. Removing objections often does more here than adding features.
Fix first: condition and risk
Problems buyers fear come first, because they cost you in negotiation and can cancel a deal. These include water problems, roof and drainage issues, safety items, pest damage, and unpermitted work. They rarely add to the price, but leaving them can reduce it. See our hidden-issues series [LINK] and our checklist of overlooked prep items [LINK].
A word of caution: Washington's contractor registration law (RCW 18.27) generally lets homeowners work on their own property without a contractor registration, but that exemption does not apply to someone who performs contractor work on their own property for the purpose of selling, demolishing or leasing it (see RCW 18.27.090(12) and RCW 18.27.010). In practice, if you are repairing or remodeling to get a home ready to sell or rent, assume the owner exemption may not protect you, and hire a registered contractor for that work. Permits, electrical work and plumbing work have their own separate rules, and unpermitted or poorly done DIY work may also have to be disclosed on the Form 17. To check your situation, contact the Washington Department of Labor & Industries (L&I) or an attorney.
Freshen next: appeal
These changes often have the best return on cost because they change how the home looks and feels in photos and at showings.
· Deep cleaning and odor removal
· Paint in light neutral colors
· Lighting and window coverings
· Decluttering and storage
· Curb appeal and a clean exterior
· Refinishing existing hardwood floors
Decide carefully: larger projects
Kitchen and bath remodels, new hardwood or other flooring throughout and additions that increase square footage are expensive and can take months.
Carpet, paint and hardwood refinishing may be worthwhile as they specifically speak to whether the home will be "move in ready" for a buyer. These can also be done relatively quickly and inexpensively compared to major remodels.
Whether any of these pay back depends on their current condition, the home's price range, your neighborhood and what comparable homes offer. Ask your agent what buyers in your price range expect before starting.
Skip or limit
· Projects chosen for your own taste, such as unusual finishes or colors.
· Upgrades that leave a known defect unfixed.
· Large DIY projects because they always take longer than expected; your time is better spent on other things to prepare for the sale.
· Anything that needs permits that require extensive lead time.
What order should I do these in?
1. Get an agent walk-through and a list of what buyers will notice.
2. Find the causes of any major problems and fix them, especially to mechanical systems like heating, air conditioning, or roofing, plumbing, etc.
3. Do the "appeal" work that costs little and offers bang for the buck.
4. Price larger projects against the likely return, or choose to alter the listing price and/or provide a buyer credit instead.
From Our Own Experience
One of our listings a few years ago was a home in bad shape, with unfinished projects and a lot of deferred maintenance. The sellers were motivated to sell, and needed to get the house on the market quickly. However they didn't have the funds (or credit) to do any major work before listing.
In preparing the home we had to identify:
- What could be fixed within the timeline and budget
- What needed to be disclosed on the Form 17 (Seller Disclosure), and whether it was addressed or not.
- How to keep the sellers focused on what they needed to do to move
- How to address the ability to keep the home "showing ready" while on the market.
Our Approach
After multiple meetings with the sellers, we decided to manage the project ourselves, freeing the sellers to focus on packing and moving.
What we did:
- Identified and managed handyman services to fix the issues that were relatively easy. This included making any non-licensed repairs (doors, painting, etc.) to touch up and create a more updated look.
- Worked with the sellers to identify a vendor to recarpet the home. As part of this process we initiated a three-stage plan with the vendor:
- Vendor removed the carpet and padding one day
- A handyman was employed for a single day to remove squeaks and prime the sub floors (to address pet stains, etc.)
- The carpet vendor returned to install the carpet and padding
- Managed disposal of old, unneeded items (aka junk). This included furniture, yard waste, old tools, unwanted clothing, and other items. For this the disposal company needed to make three separate trips to the transfer station.
- Replaced most lightbulbs to provide consistent, bright quality light throughout the home.
- Yard cleanup with a professional landscaper.
- Managed a set of cleaners to provide a deep clean for the home.
- Professional staging (funded by us) to make the home attractive.
What we didn't do:
- Take on major remodeling or time consuming repairs.
- We documented and disclosed any issues that required licensed repairs that were not critical or safety concerns.
- Priced the home with the understanding that the buyer would need to invest in it to "make it their own". This allowed us to limit the pre-listing investment while providing both the buyer and seller an advantage.
The Result
Even though this home was put on the market in a traditionally difficult time to sell, through pricing and all of the prep work we were able to market the home well. In the end, we had a near record number of showings and open house groups through, and within the weekend had multiple offers and were able to improve the listing price considerably without any contingencies, a quick close, and a plan for the sellers to move on with their lives.
While this was one of the most challenging homes for us to list, and we did a lot more work than we originally planned, we were able to provide the seller with a solution to their issue in a way that was beneficial to them.
Thinking about selling in the Seattle Area?
Kelly Azzarello Real Estate | Compass
kelly@kellyazzarello.com | (425) 830-6457
Instagram: instagram.com/kellyazzarello
YouTube: youtube.com/kellyazzarellorealestate
Disclaimer
This post is general information about real estate topics. It is not legal, tax or financial advice, and it does not replace a professional inspection. Rules and practices differ by situation and change over time. Check current requirements and talk with a licensed professional, such as an inspector, contractor, attorney or CPA, about your own property.
Is Bolting Your Foundation Worth It? Earthquake Retrofits for Eastside Homes
Some home upgrades you can see from the street. This one you can't. A foundation retrofit happens in the crawlspace, where almost nobody looks until a home inspector, or an earthquake, forces the question.
It's also one of the most cost-effective things the owner of an older Eastside home can do. Below, we walk through what a retrofit is, why it makes financial sense, and how to tell whether your home needs one. It's part of our series on hidden issues worth understanding before they get expensive, whether or not you plan to sell soon.
Why this matters on the Eastside
We live and work on top of active faults. The Seattle Fault runs east to west beneath downtown Seattle and Puget Sound, passes through or near Bellevue and Mercer Island, and reaches toward the foothills near Issaquah. It last ruptured about 1,100 years ago in a quake estimated at magnitude 7 or higher.
Offshore, the Cascadia Subduction Zone is capable of a magnitude 9 earthquake. The U.S. Geological Survey has put the chance of one striking within the next 50 years at about 14 percent. Nobody can predict the date, which is the whole point: the time to prepare is before there is one.
What actually fails in an older house
Most older homes in our area are a wood-frame house sitting on a concrete foundation. In many of them, the frame is held in place mostly by its own weight, with little or nothing fastening it to the concrete. Between the foundation and the first floor there is often a short framed wall called a cripple wall (also called a pony wall), and in older homes it is frequently open framing with no plywood bracing.
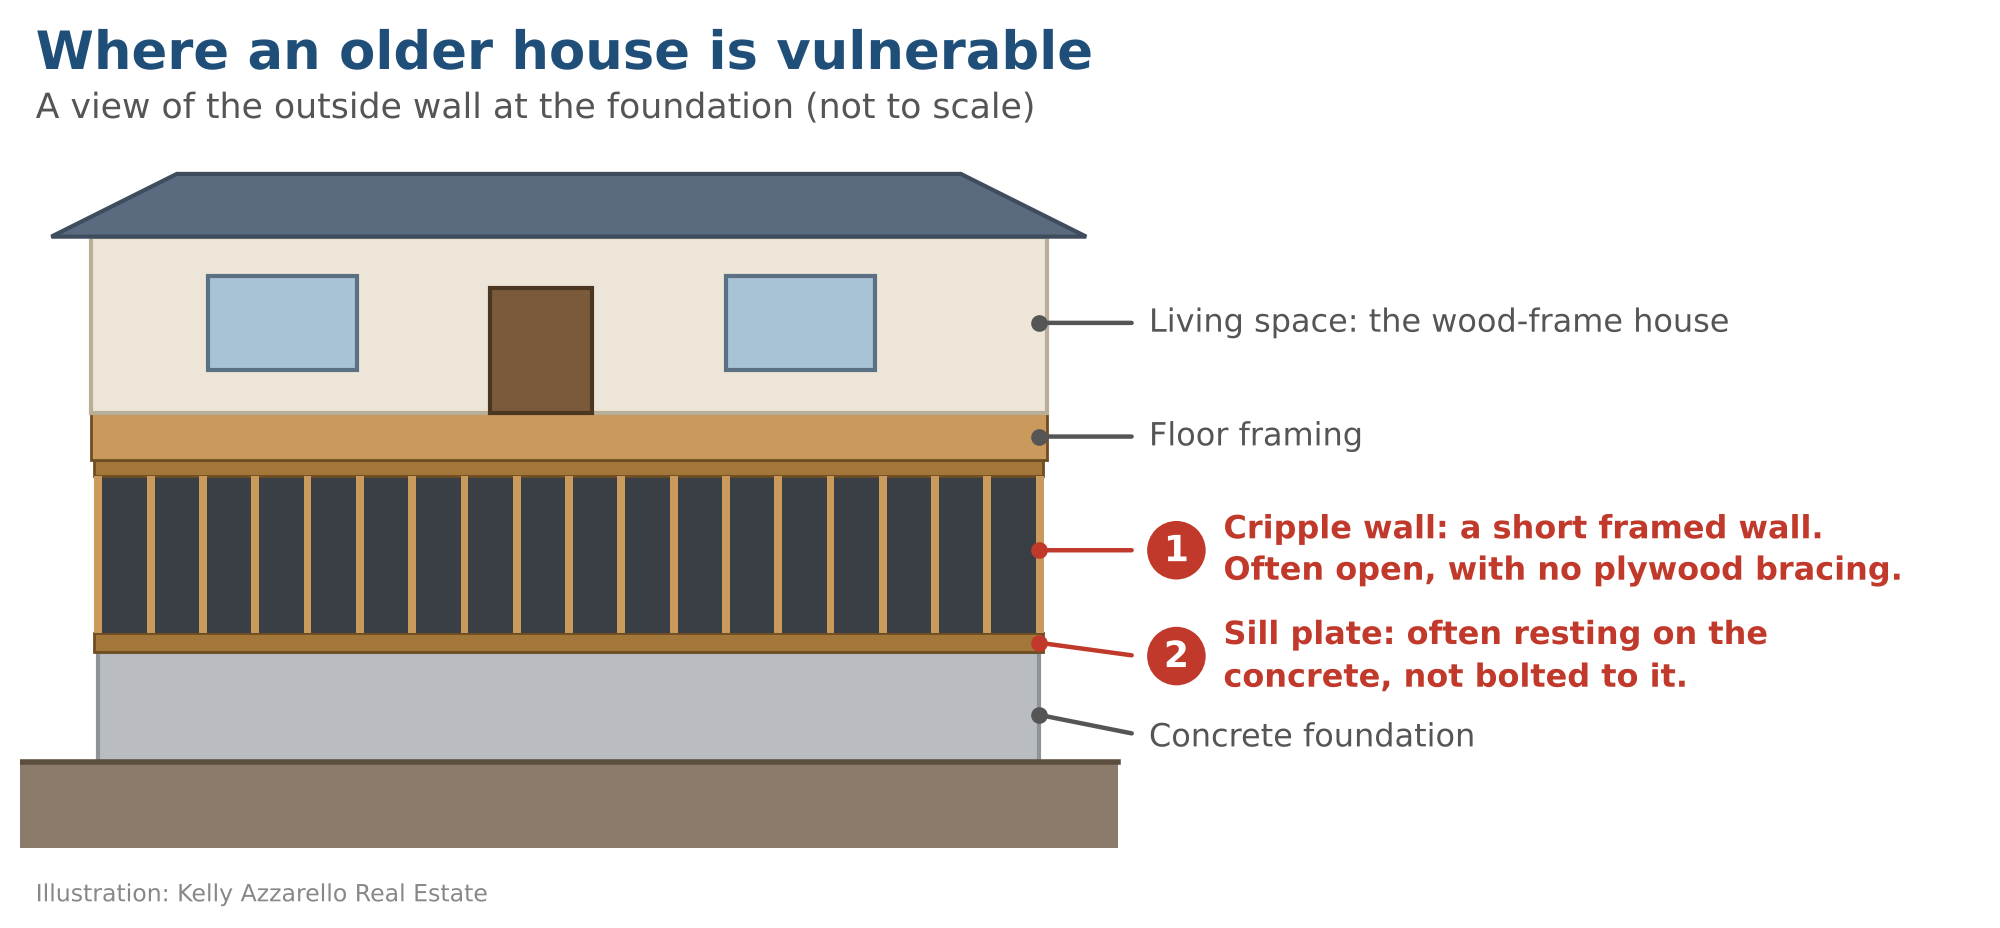
Figure 1. The two weak points in many older homes: the cripple wall and the sill plate.
According to the City of Seattle's retrofit guidance, most earthquake damage to single-family homes comes from one of two failures: the house jumping off its foundation, or a weak cripple wall collapsing. Either one can leave a home unlivable and very expensive to repair.
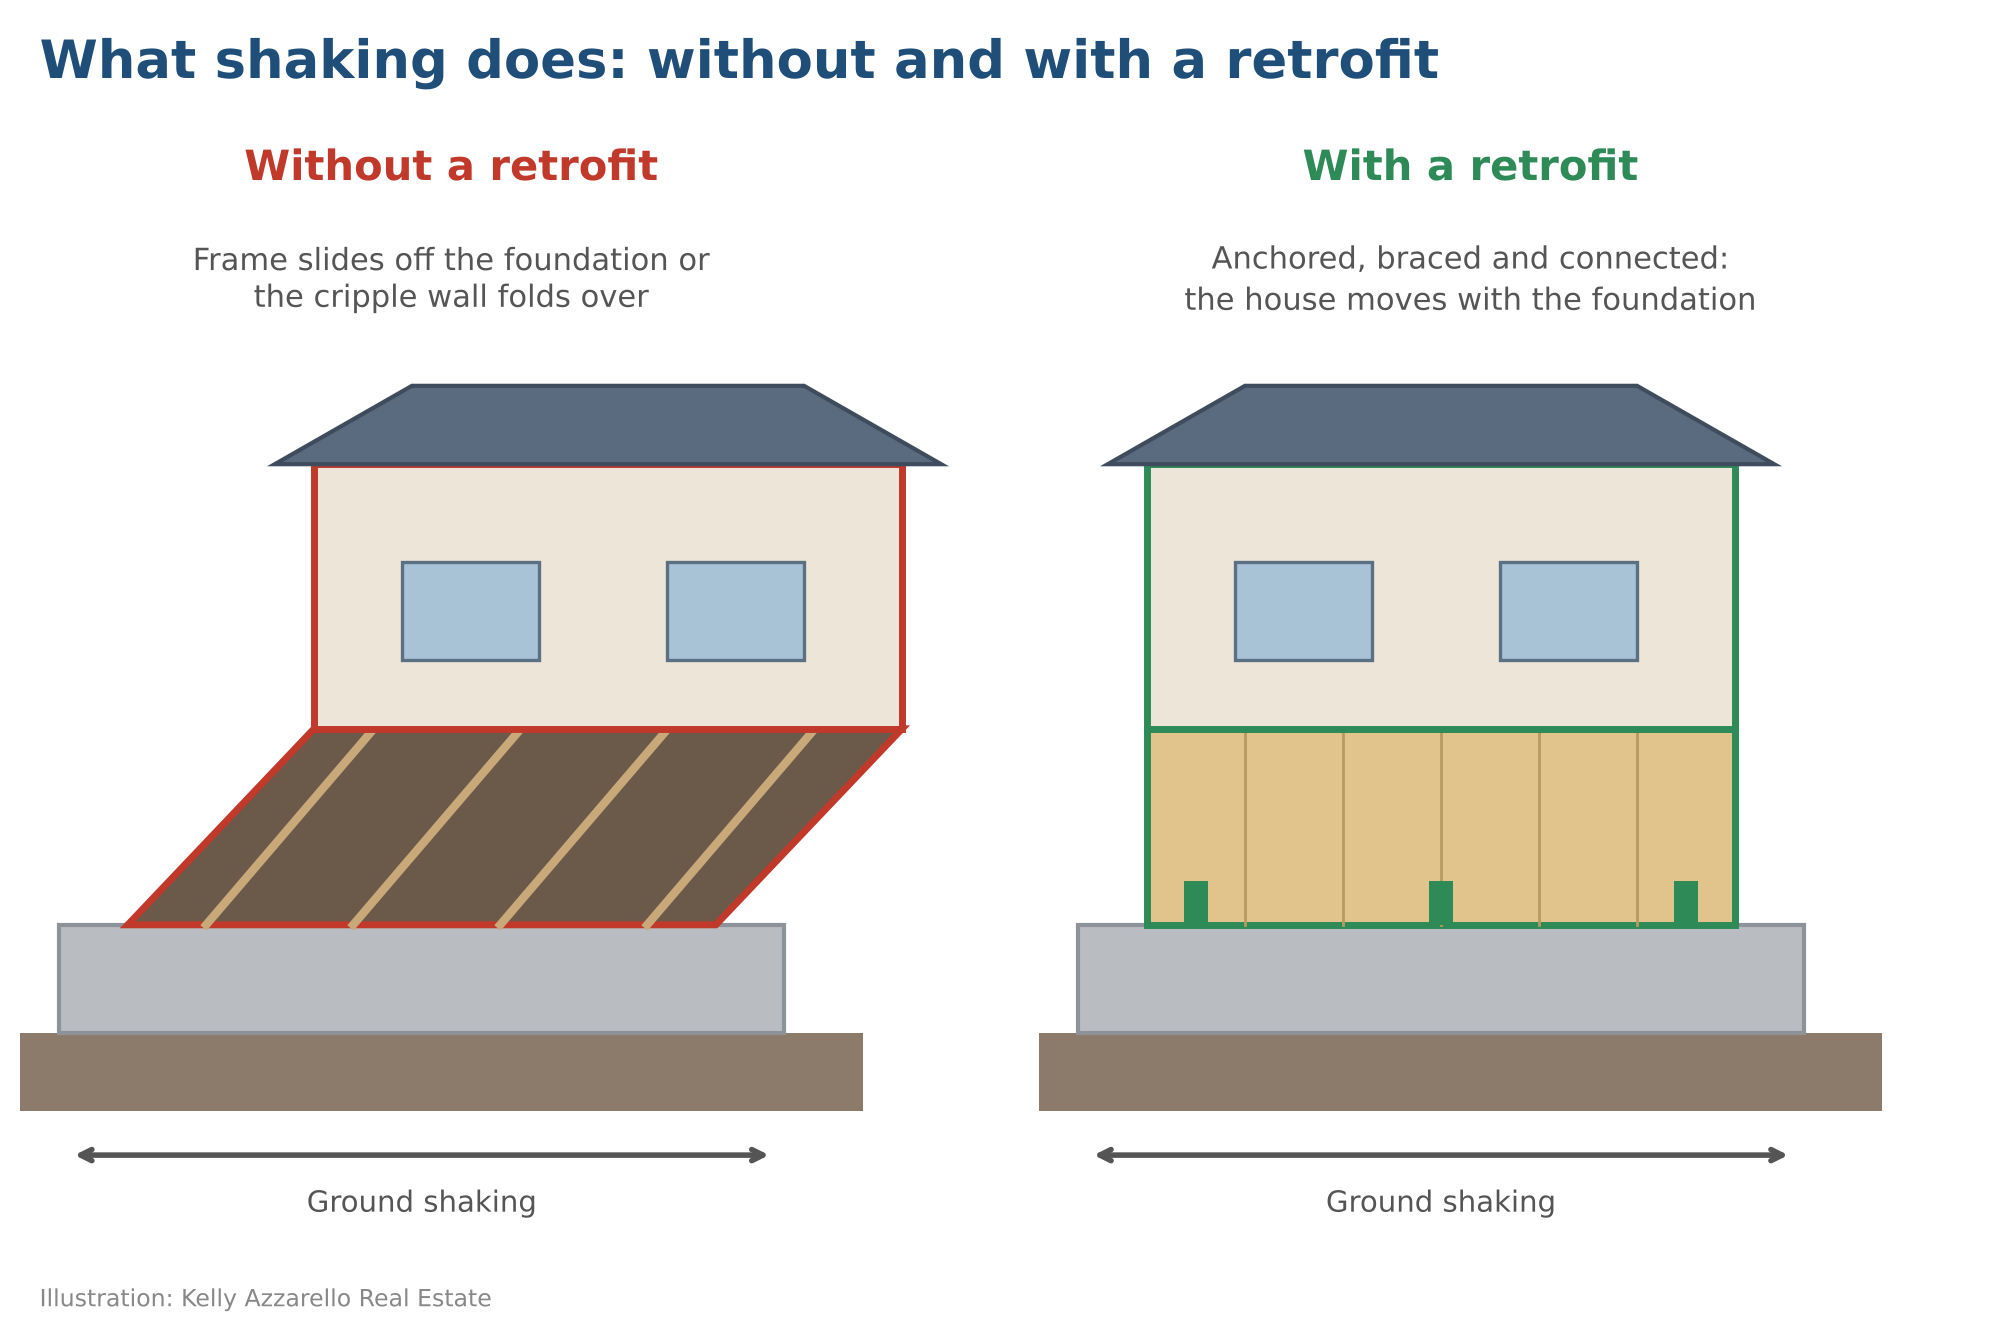
Figure 2. Without a retrofit, the frame can slide or the cripple wall can fold. With one, the house moves with the foundation.
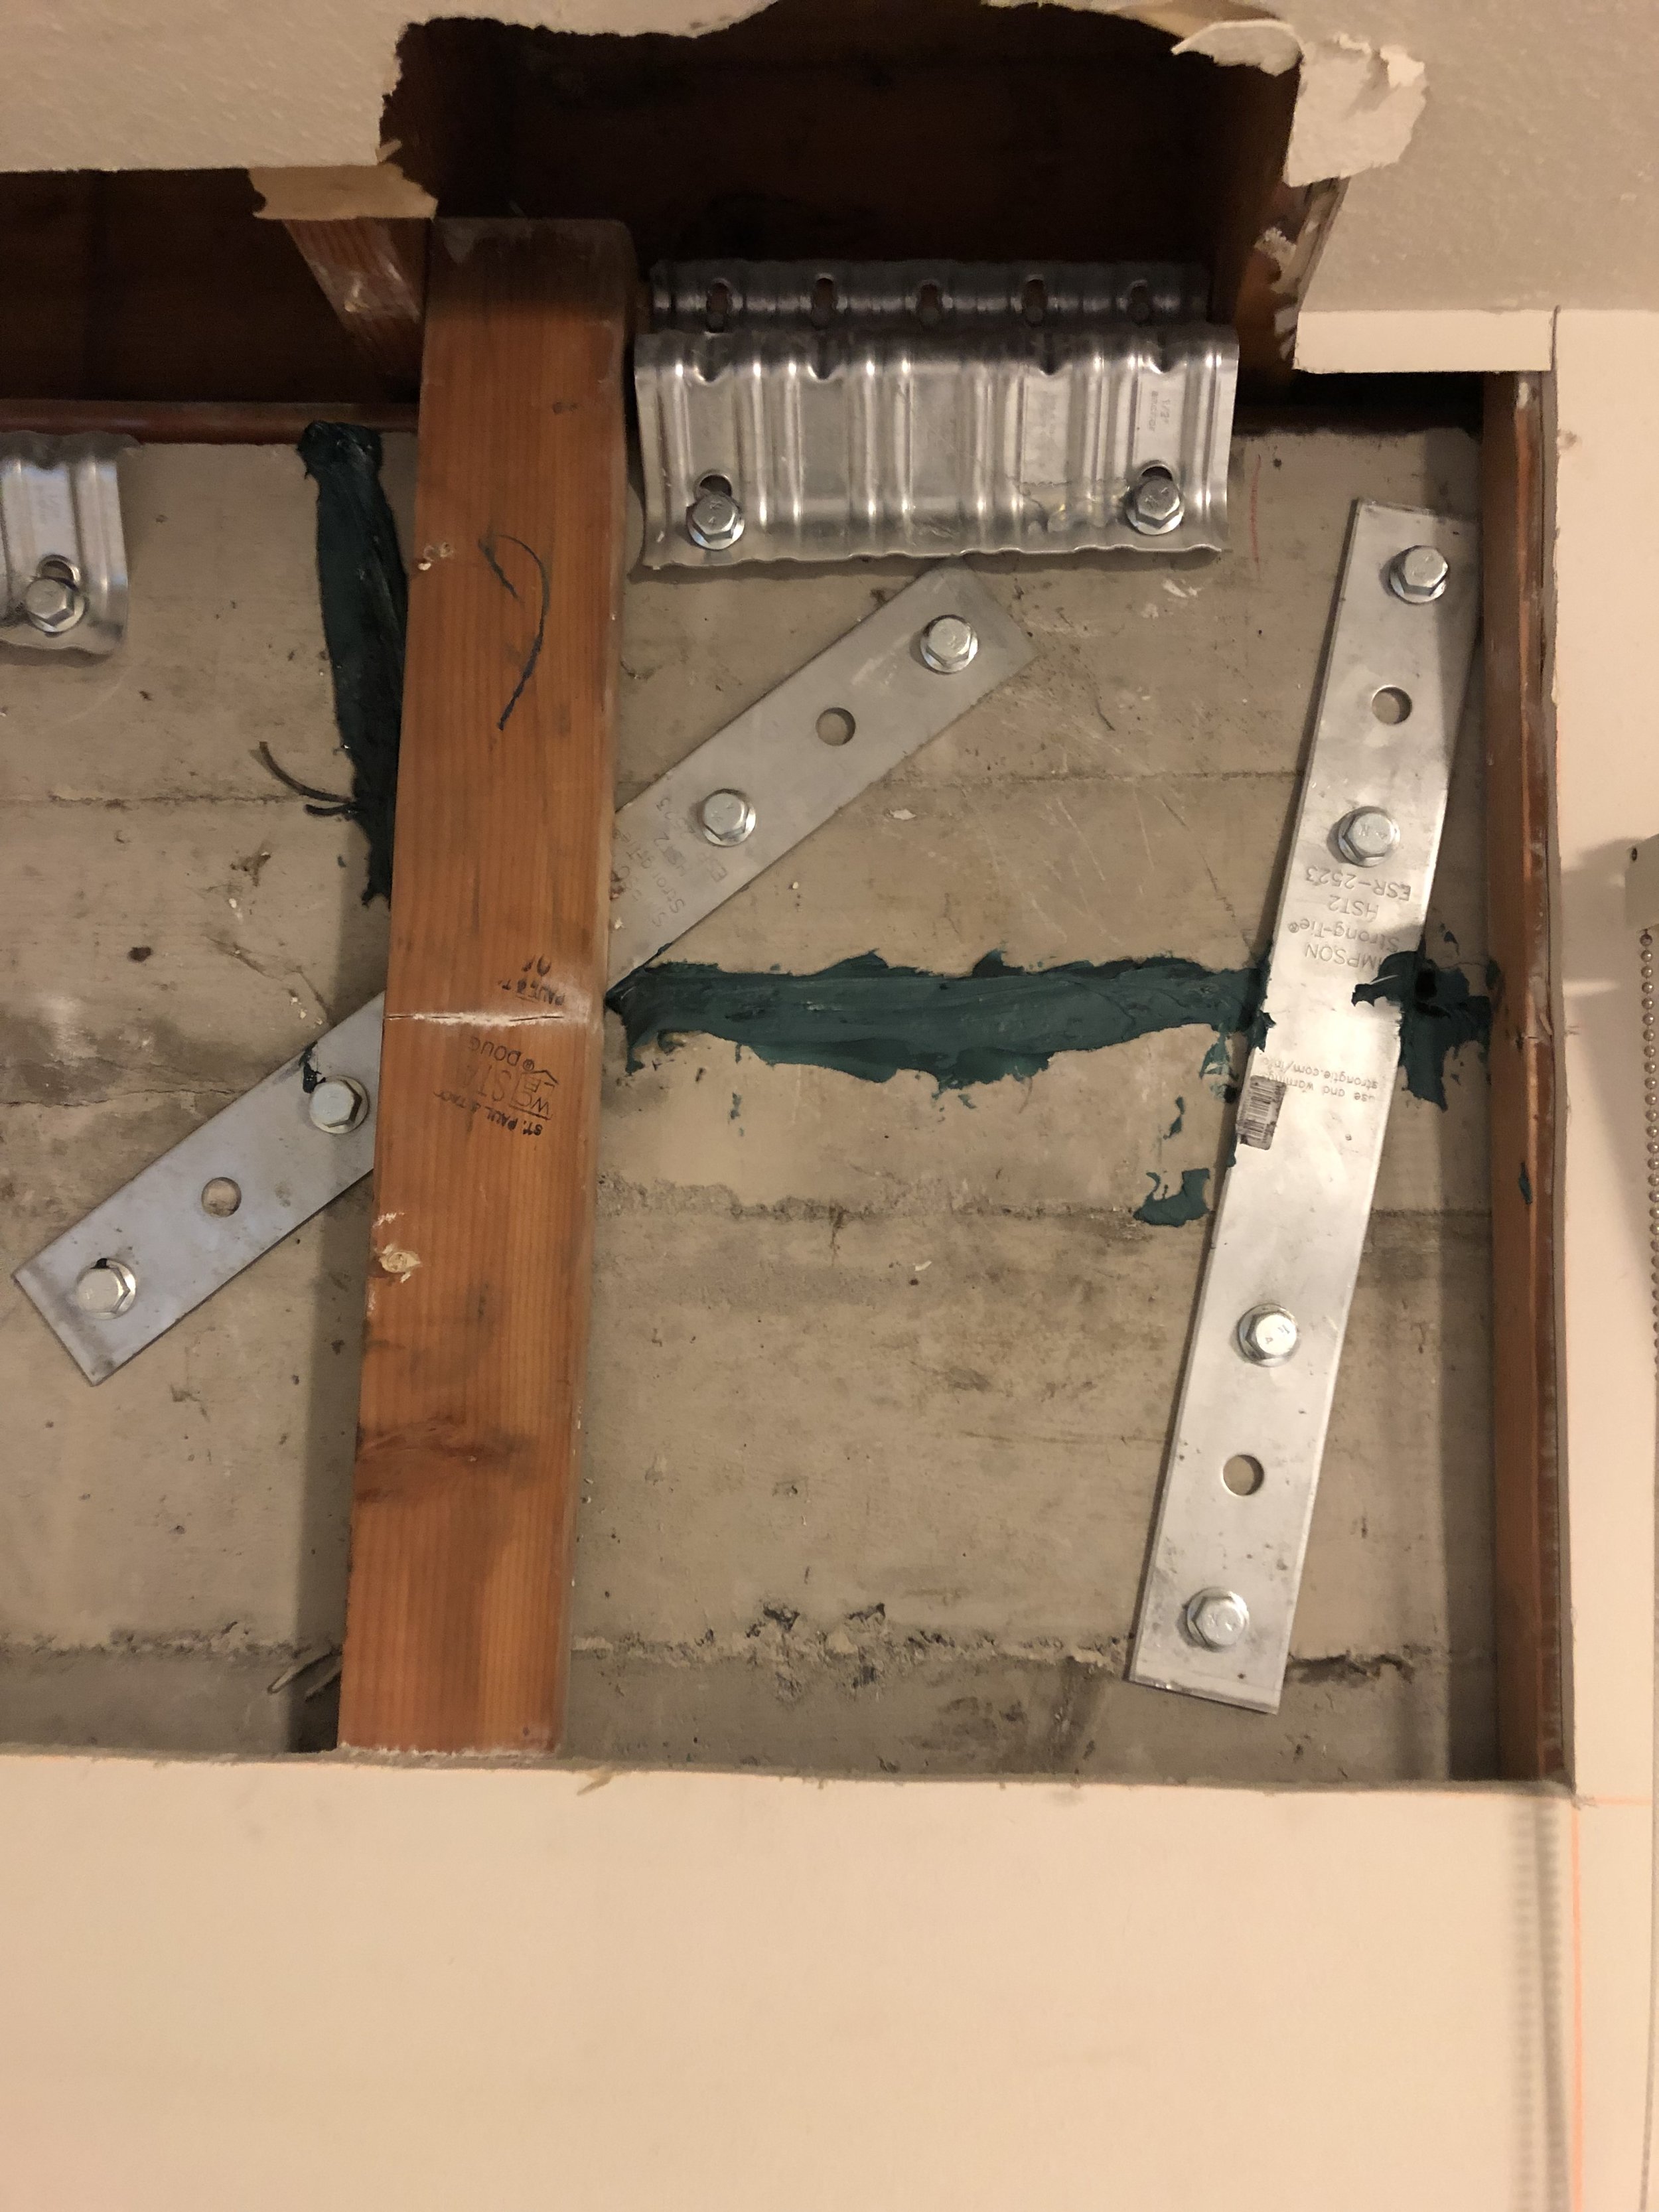
Strapping applied.
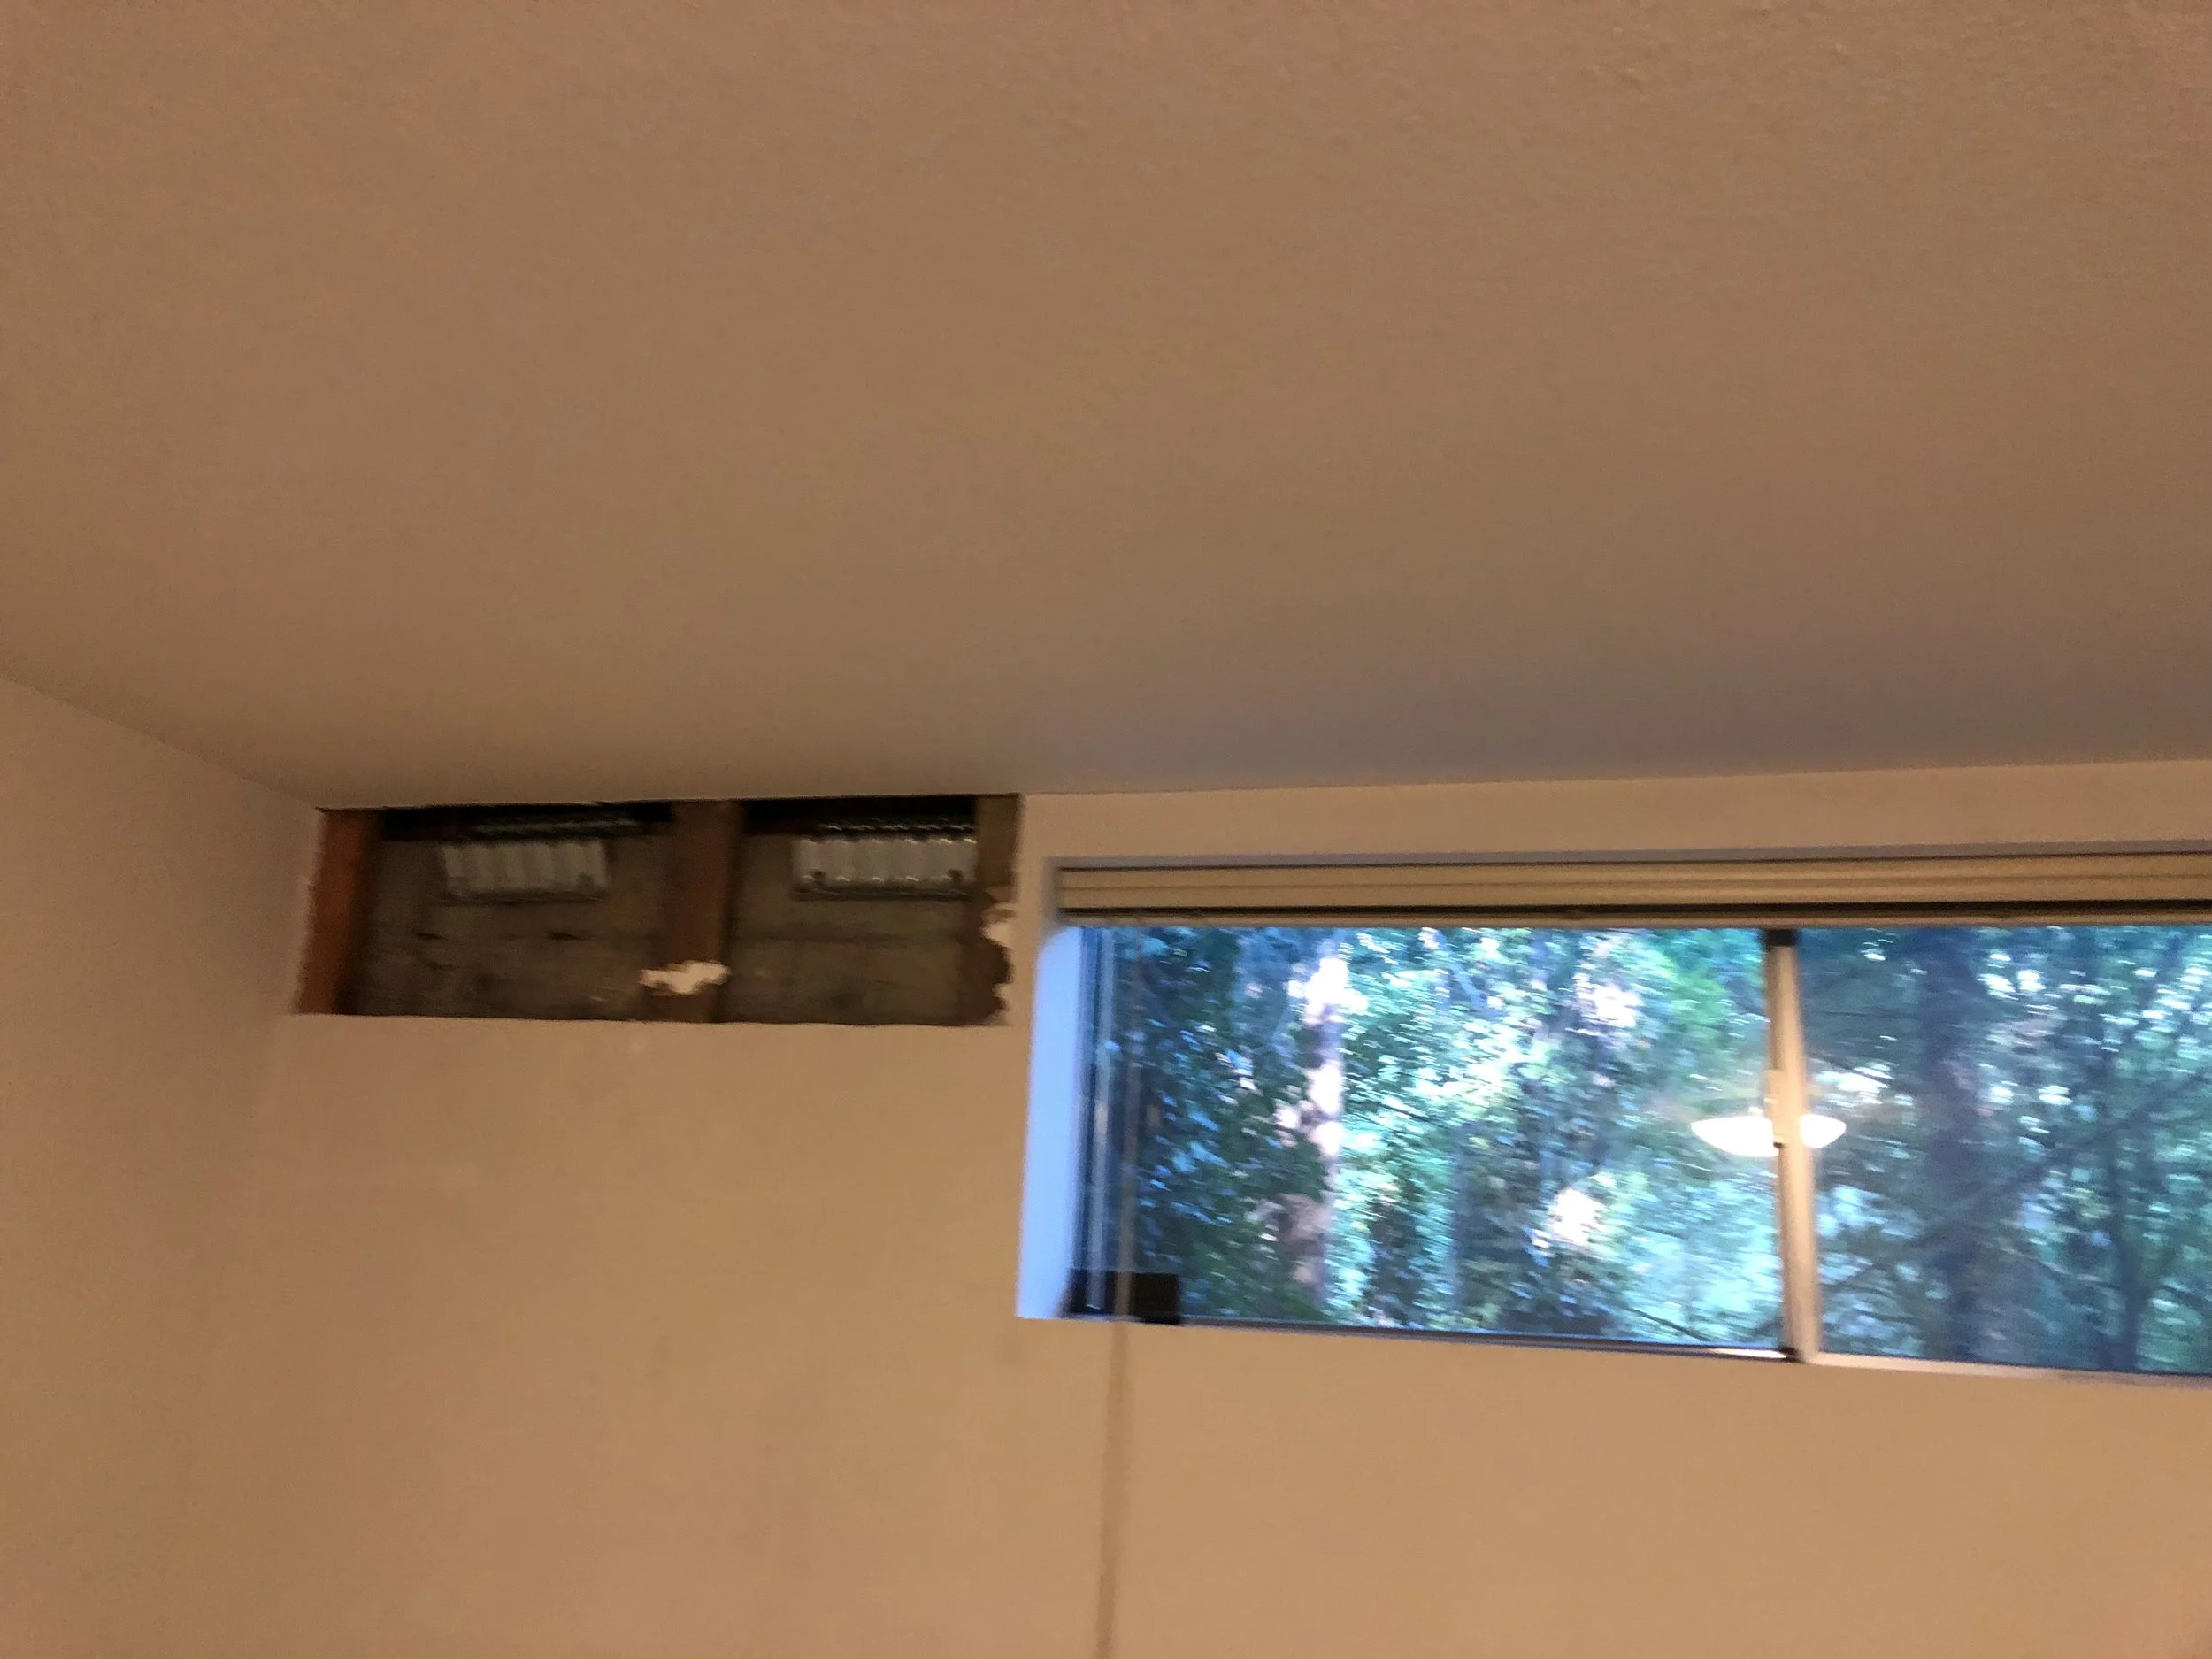
Drywall removed to facilie seismic retrofit.
Is your home a candidate?
Age is the quickest clue. Local retrofit contractors say homes built before about 1980 may not be properly secured, and homes built before about 1965 typically have no anchor bolts at all. A lot of the Eastside's older housing stock falls in that window, including pockets of Bellevue, Renton, Redmond and Issaquah.
Newer neighborhoods, like much of Sammamish and Klahanie, were built under more modern codes and are more likely to be anchored already. "More likely" isn't the same as confirmed, so it's worth a look. A quick check from the crawlspace access:
• Bolts: Look for bolt heads or nuts with square plate washers along the wood that sits on top of the concrete.
• Plywood: Look for plywood nailed to the short walls between the concrete and the floor. Open stud framing is a flag.
• Hardware: Look for metal connectors tying the floor framing to the wall below.
• Not sure? Ask a licensed contractor or structural engineer to take a look. Crawlspaces can hide moisture, wiring and pests, so we don't suggest crawling in alone if you're unsure.
Homes built on a slab, with no crawlspace, don't have this particular weakness. Homes with finished basements or unusual layouts may need an engineer's input.
What a retrofit involves: anchor, brace, connect
The City of Seattle sums the work up in three words, and the idea is simple: give the house a continuous path from the roof to the ground so it can't separate from its foundation.
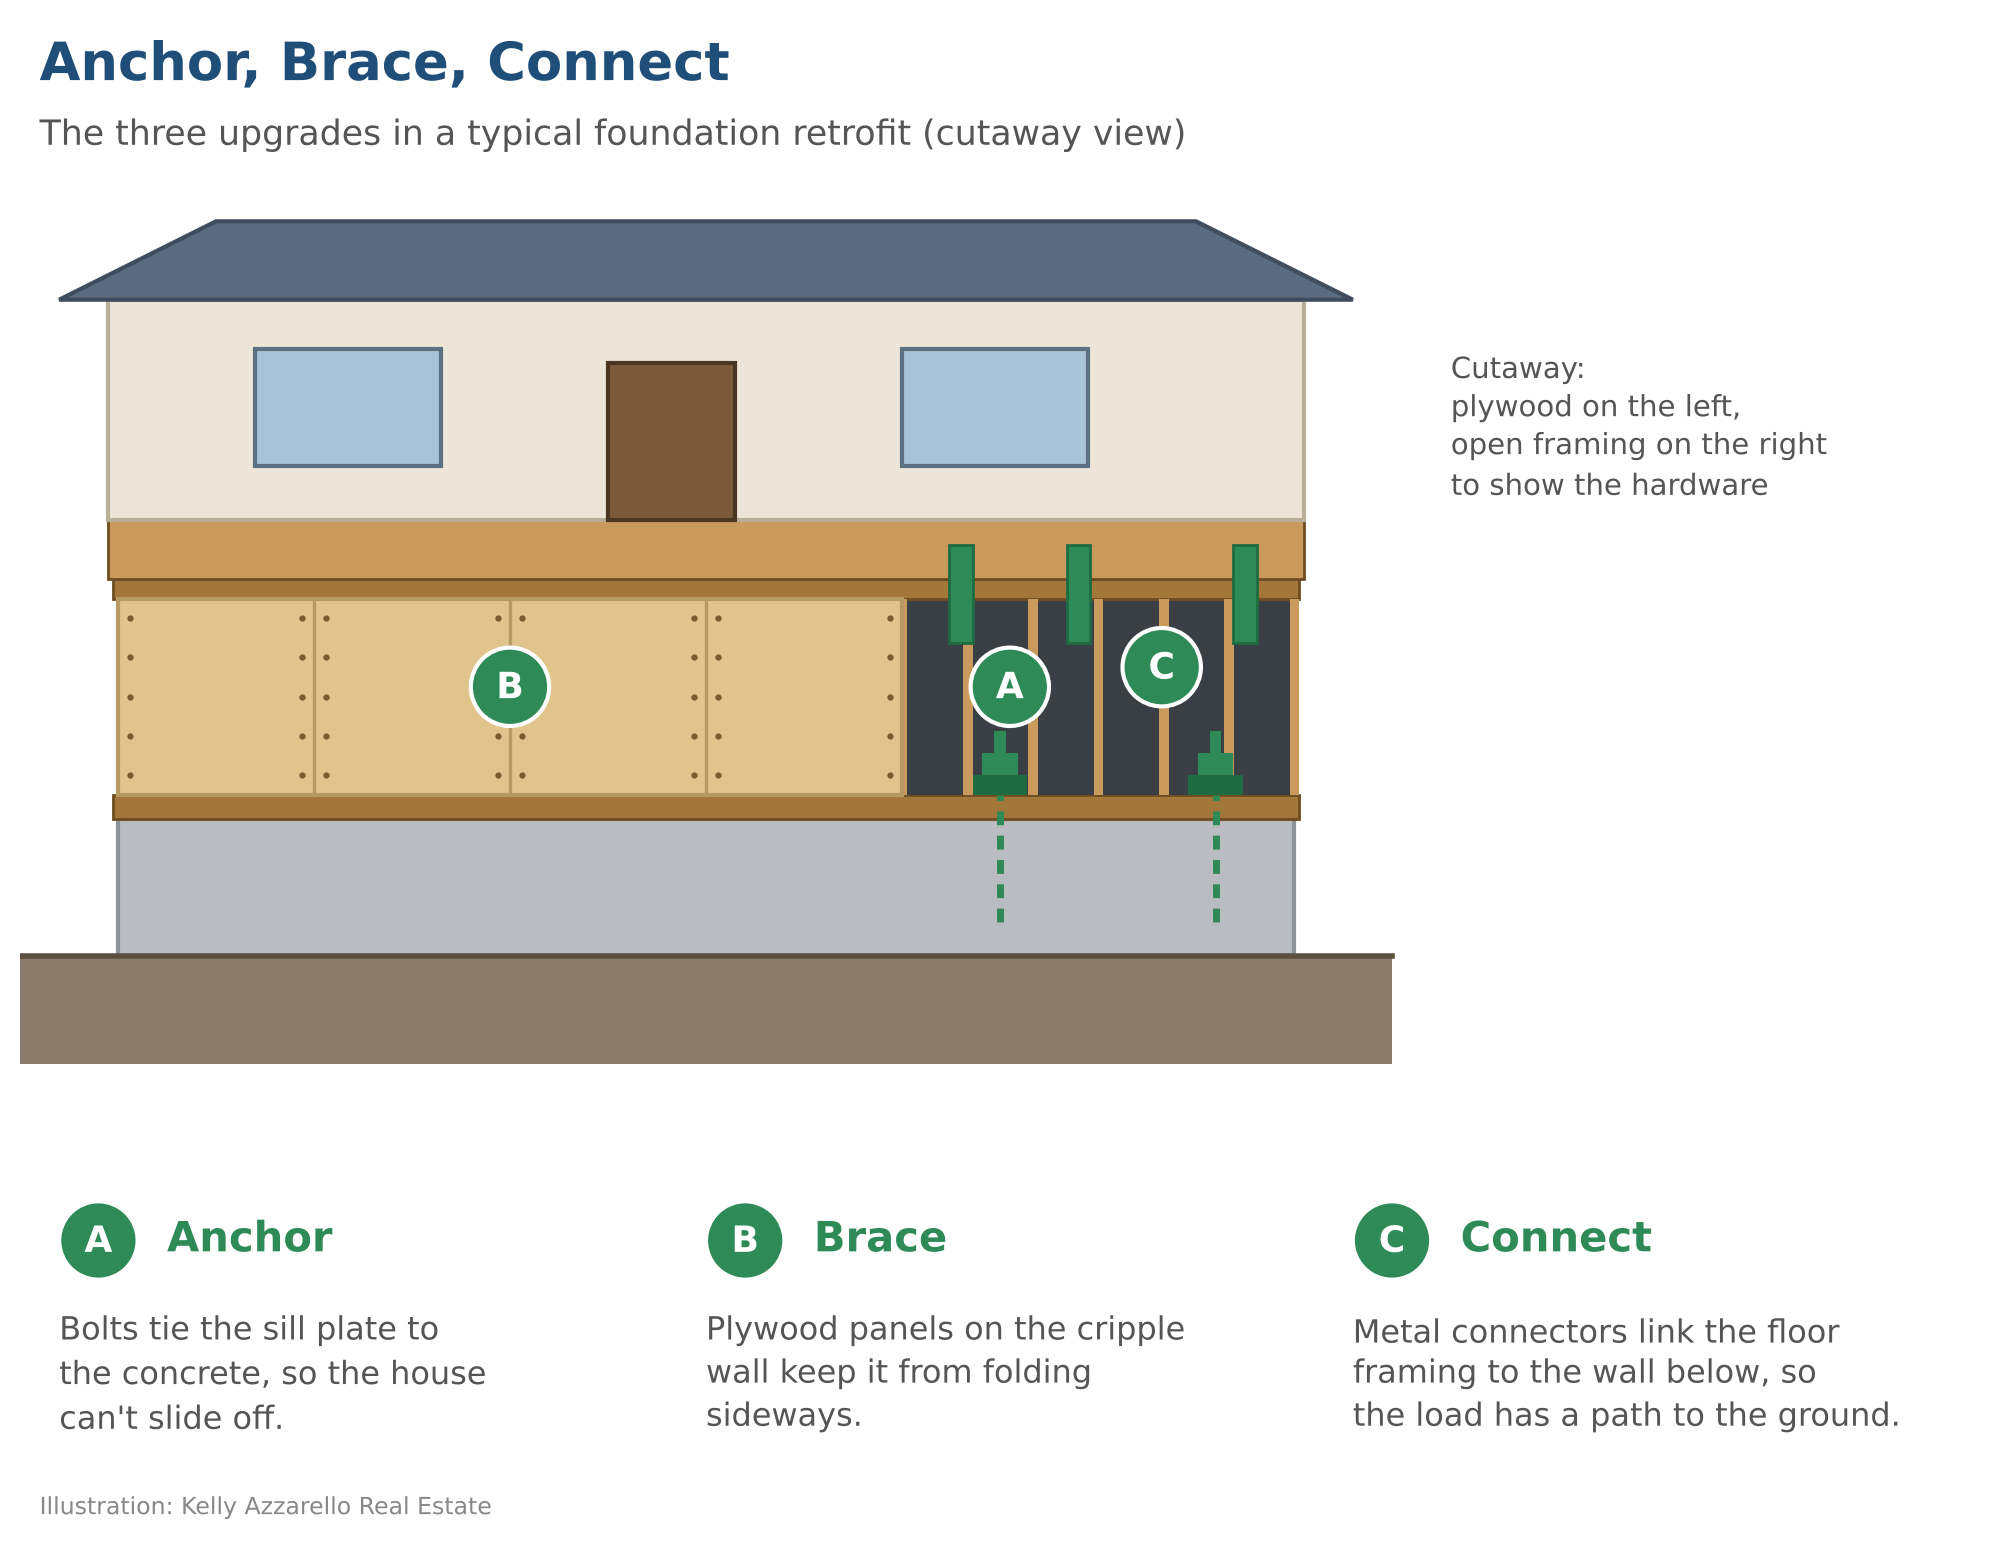
Figure 3. Anchor, brace, connect: the three parts of a typical foundation retrofit.
• Anchor: Bolts fasten the wood sill plate to the concrete foundation.
• Brace: Plywood panels on the cripple walls keep them from folding sideways.
• Connect: Metal framing hardware ties the floor framing to the walls below.
Most of the work happens in the crawlspace rather than inside your living space, which makes it a relatively low-disruption project.
Why it's a good investment
Think of it as a small premium against a large loss that, for most homeowners, isn't covered.
The cost is modest compared to the exposure. Seattle-area retrofit contractors put the average job at roughly $5,000 to $12,000, with higher figures for homes with finished basements. National cost guides list Seattle-area foundation bolting from about $1,100 to $5,600 and cripple wall bracing from about $1,100 to $3,300, so the size and access of your crawlspace matter a great deal.
Standard homeowners insurance doesn't cover earthquakes. That takes a separate policy, and those commonly carry deductibles of 10 to 25 percent. On a home with $600,000 of dwelling coverage, that is $60,000 to $150,000 out of your pocket before the policy pays anything. A retrofit lowers the odds of the most common kind of structural failure, which is damage you may have to absorb yourself.
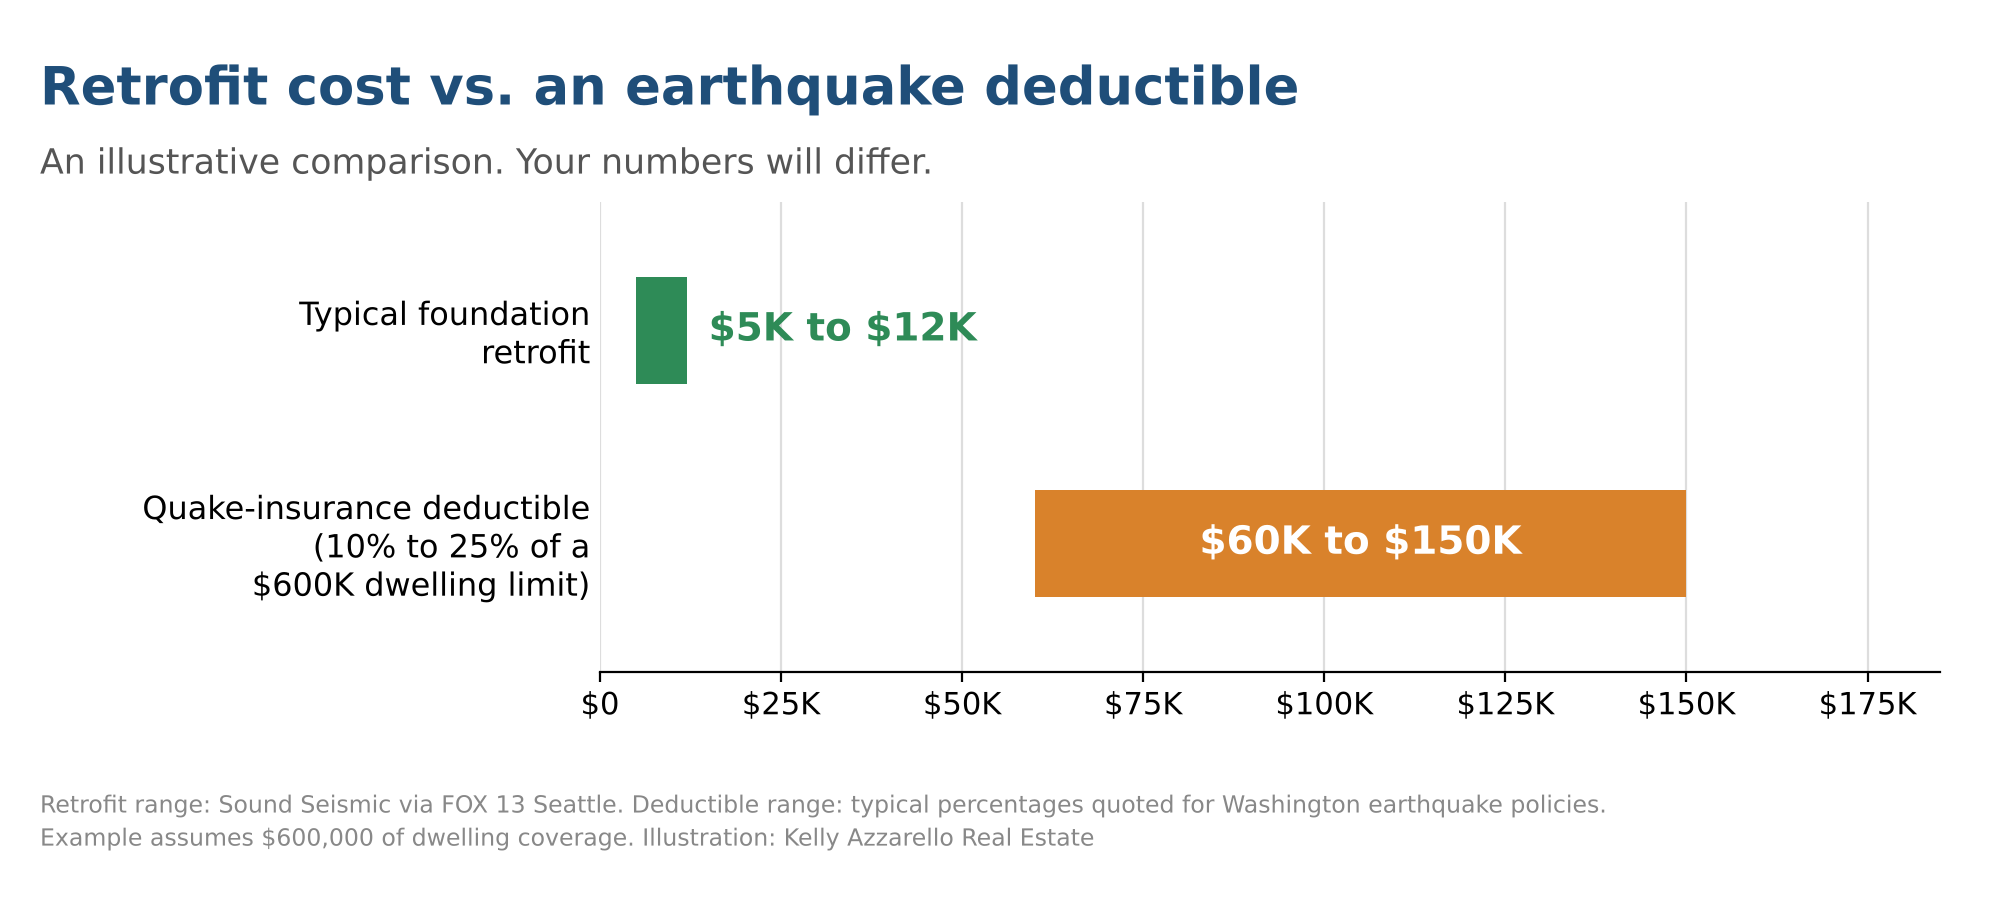
Figure 4. An illustrative comparison. Your coverage and costs will differ.
Some insurers reward it. Homes with foundation bolting or cripple wall bracing may qualify for earthquake premium discounts with some carriers. It's worth asking your insurance agent before and after the work.
It protects rentals and the people in them. For investment property, a retrofit protects both the asset and the safety of the tenants who live there.
It makes a house easier to sell. We can't promise a retrofit adds dollar-for-dollar value, and we wouldn't want you to count on that. What it does is remove an unknown. Inspectors typically note whether a foundation is anchored, and buyers in earthquake country can reasonably ask about it. A permitted, documented retrofit turns a possible negotiating point into a selling point.
What a retrofit won't do
A retrofit addresses the two most common failures. It doesn't make a home earthquake-proof. Unreinforced brick chimneys, heavy masonry veneer and some garage designs are separate issues and may need their own attention.
Permits are generally required. Seattle and most communities in the Northwest require one for this work, and each Eastside city has its own process, so check with yours before work begins. Get more than one bid, and ask each contractor to explain exactly what they'll anchor, brace and connect.
Thinking about selling?
If you may sell in the next few years and your home falls in the age range above, a retrofit can be one of the smarter projects to do first. Handling it on your own timeline, with permits and paperwork in hand, is far easier than negotiating a repair request against a closing date.
From Our Own Experience
A few years ago a good friend told me about this. I wasn’t aware of the underlying issues or the history of the home, but over lunch we had a long discussion. Especially if you’re buying an older home, you need to make certain that the
While our friend wasn’t ready to sell, he was very concerned about the safety of his family AND his eventual resale value of the home.
Wondering about your own foundation?
As agents, we work with contractors, suppliers and vendors regularly, and we've helped clients through big repairs. We can't recommend specific companies, but we can help you find the right fit and compare bids, whether you're buying, selling or just planning ahead.
Kelly Azzarello Real Estate | Compass
(425) 830-6457 | kelly@kellyazzarello.com | www.kellyazzarello.com
We're real estate professionals, not engineers or contractors. This post is general information, not structural, insurance or legal advice. A licensed structural engineer or contractor can assess your specific home, and your insurance agent can explain your coverage options.
Sources and further reading
• City of Seattle SDCI: Protect Your Home from Earthquake Damage (PDF)
• FOX 13 Seattle: Does your home need an earthquake retrofit? Here's how to check
• KOMO News: 14 percent chance of megaquake hitting Seattle, experts say
• Angi: How much does earthquake retrofitting cost in Seattle?
• Earthquake Tracker: Earthquake insurance in Washington State
• Earthquake Tracker: The Seattle Fault

Sewer Scope: Part III
The Sewer Scope Found a Problem.
Costs and Options
What to do first, what it can cost, and how to work through it whether you're selling or buying
The camera came out of the line, and the news isn't good. A crack, roots, a sag, a section that's partly collapsed. It's a stomach-drop moment, but it's also the moment the scope was for. You now know something you couldn't see, and you know it while you still have choices.
What to do first
• Get the video and the written report. You need both. The video shows exactly where the problem is, and a plumber can use it to bid.
• Don't panic and don't rush. A finding doesn't always mean a full replacement. Many problems are local and can be repaired in one section.
• Get a licensed plumber's written estimate. Ask them to watch the video and tell you what they would do and why.
• Get a second bid. Repair methods and prices vary a lot, and a second opinion can tell you whether the first bid is fair.
• Ask who is responsible for the line. In many places the homeowner owns the pipe from the house to the connection at the main, but rules differ. Check with your city or sewer district.
What does it cost to fix a sewer line problem?
This is where the surprises are. Repair prices vary a lot with pipe length and depth, access (driveways, landscaping, retaining walls), the repair method, and local permits and labor rates.
| Type of work | Commonly cited range |
|---|---|
| Spot repair of one damaged section | A few thousand dollars, roughly $1,500 to $7,500 |
| Trenchless lining or pipe bursting | Often $4,000 to $20,000+, depending on length |
| Full line replacement | Roughly $10,000 to $25,000+ in many markets |
National averages you'll see online are often much lower than what homeowners in higher-cost metro areas pay. In the Seattle area, for example, contractors publishing 2026 pricing put a full replacement anywhere from about $10,000 into the low $30,000s, and permits alone can add hundreds to a couple thousand dollars. Always get more than one written bid.
If you're selling
Sellers commonly take one of three paths:
• Repair before closing. You control the contractor and the timeline, and you can hand the buyer paperwork showing the work is done.
• Offer a credit at closing. The buyer takes over the contractor and the timeline. A written bid helps you set a number everyone can agree on.
• Adjust the price. Often used when the buyer would rather handle the repair themselves.
Disclosure rules vary by state and by type of seller, and a known defect generally needs to be disclosed where disclosure is required. "As is" doesn't stop a buyer from inspecting, asking for credits, or walking away. Ask your agent and, if needed, an attorney how the rules apply to you.
If you're buying
You typically have three options, and your inspection contingency is what makes them possible:
• Ask the seller to repair the line before closing
• Ask for a credit at closing
• Ask for a price reduction
If the problem is severe and the seller won't work with you, your contingency may let you walk away. Real bids from licensed plumbers turn an alarming report into a number you can negotiate with.
Why finding out early matters
Problems found early, with real repair estimates in hand, are much easier to work through, whether that means a repair, a credit, or a price adjustment. That's the real value of a sewer scope: not the report itself, but the time and options it gives you.
Earlier in this series
• Post 1: What Is a Sewer Scope Inspection?
• Post 2: Who Can Scope Your Sewer Line, an Inspector or a Plumber?
If something turns up, we can help
Hopefully you'll never need to reline or replace a sewer line. For most homeowners, it's a once-in-a-lifetime event. For us, as agents, it isn't. We see situations like this and have experience helping people through them.
We work with contractors, suppliers, and vendors regularly. We can't recommend specific companies, but we can help you work out what kind of professional you need, what questions to ask, and how to compare bids, so you find the right fit for your situation.
Whether you're selling soon or someday, we're glad to be a resource.
Kelly Azzarello Real Estate | Compass
kelly@kellyazzarello.com | (425) 830-6457 | www.kellyazzarello.com

Note:
Cost ranges are general estimates drawn from published 2026 cost guides and vary by property, region, and contractor. Get written bids from licensed professionals. This post is general information, not legal advice; disclosure rules differ by state.
Sewer Scope: Part II
Who Can Scope Your Sewer Line, an Inspector or a Plumber?
Booking a sewer scope sounds simple until you start making calls. Some inspectors say yes, some say no, and some say they can do it only if there's a cleanout. And the person who does it may or may not be the one you'd want to hire if the news is bad.
Here's how it works, who can do it, and what to ask before you book.
Not every inspector offers sewer scope Services
A sewer scope takes specialized camera equipment and training, so some inspectors offer it as an optional add-on and others don't. Those who don't will usually refer you to a plumber or a company that only does sewer cameras. When you book, ask:
• Do you perform sewer scopes?
• Will I get the video and a written report?
• What happens if there's no accessible cleanout?
How does the camera get into the line?
The scope is more hands-on than the rest of an inspection, because the technician needs a way into the main sewer line. In order of how disruptive they are:
• An accessible cleanout. Outside the house, in a garage, or in a basement. This is the easiest route: the cap comes off, the camera goes in, and nothing else is disturbed.
• A roof vent. Some inspectors can feed the camera down a plumbing vent pipe. This only works if the roof is safe to access, and bends in the pipe can keep the camera from reaching the main line.
• Pulling a toilet. When there's no cleanout, the toilet may need to be removed to reach the drain, then reset. It works, but it's more invasive, and in some places only a licensed plumber is allowed to do it.
• Installing a cleanout. A plumber can add a permanent cleanout, often roughly $500 to $2,000. It's an added cost, but it makes this scope and future maintenance easier, and it can be a smart upgrade before you sell.
Should You Hire An Inspector or A plumber?
Plumbers can do sewer scopes too, and of course there are trade-offs:
| Home inspector | Plumber | |
|---|---|---|
| Typical Cost | Usually lower, especially as an add-on to the home inspection | Often higher than an add-on |
| Focus | Doesn't sell repairs, so there's no stake in the result | May also be the one who bids the repair |
| You Get | Video and a written report, then a recommendation to see a plumber | Video, a diagnosis, and often a repair price on the spot |
| Simple Fixes | Generally not done at the visit | Sometimes, such as a clog or minor root intrusion |
| Best When | You want the lowest-cost look, bundled with the inspection | You suspect a problem or want a price right away |
Does the person scoping need to be licensed?
It depends on where you live. In many places, a camera-only inspection doesn't require a plumber's license, but pulling toilets, installing cleanouts, and making repairs often do. Check with your state or local licensing board, and use a licensed contractor for any repair work.
Licensed, bonded, and insured mean three different things:
• Licensed: the state or local authority has approved the contractor to do the work.
• Bonded: the contractor has bought a surety bond that can compensate you if they fail to meet their obligations.
• Insured: the contractor carries liability and workers' comp insurance that covers accidents and property damage.
Ask for proof of all three, and verify the license through your state's database.
Next in this series
• Post 3: The Sewer Scope Found a Problem. Costs and Your Options
If something turns up, we can help
Hopefully you'll never need to reline or replace a sewer line. For most homeowners, it's a once-in-a-lifetime event. For us, as agents, it isn't. We see situations like this and have experience helping people through them.
We work with contractors, suppliers, and vendors regularly. We can't recommend specific companies, but we can help you work out what kind of professional you need, what questions to ask, and how to compare bids, so you find the right fit for your situation.
Whether you're selling soon or someday, we're glad to be a resource.
Kelly Azzarello Real Estate | Compass
kelly@kellyazzarello.com | (425) 830-6457 | www.kellyazzarello.com
This post is general information, not legal advice. Cost ranges are general estimates drawn from published 2026 cost guides and vary by property, region, and contractor. Licensing rules differ by state.
What Is a Sewer Scope?
Part 1: What Is a Sewer Scope Inspection?
And why a flushing toilet isn't proof your sewer line is fine
We once encountered an issue in a transaction that perfectly illustrates this. An offer came in contingent on an inspection and a sewer scope, and the scope uncovered a break in the main sewer line running out to the street. Because the pipe was buried, nobody involved had any idea it was there.
That's the thing about sewer lines. They're out of sight, and they can be failing long before you notice anything.
A working toilet doesn't mean a healthy sewer line
A toilet that flushes only tells you that waste leaves the bathroom. A sewer line can be cracked, offset, invaded by roots, or partly collapsed and still drain most of the time. Symptoms tend to show up slowly, or not at all until the day it fails.
What a sewer scope is
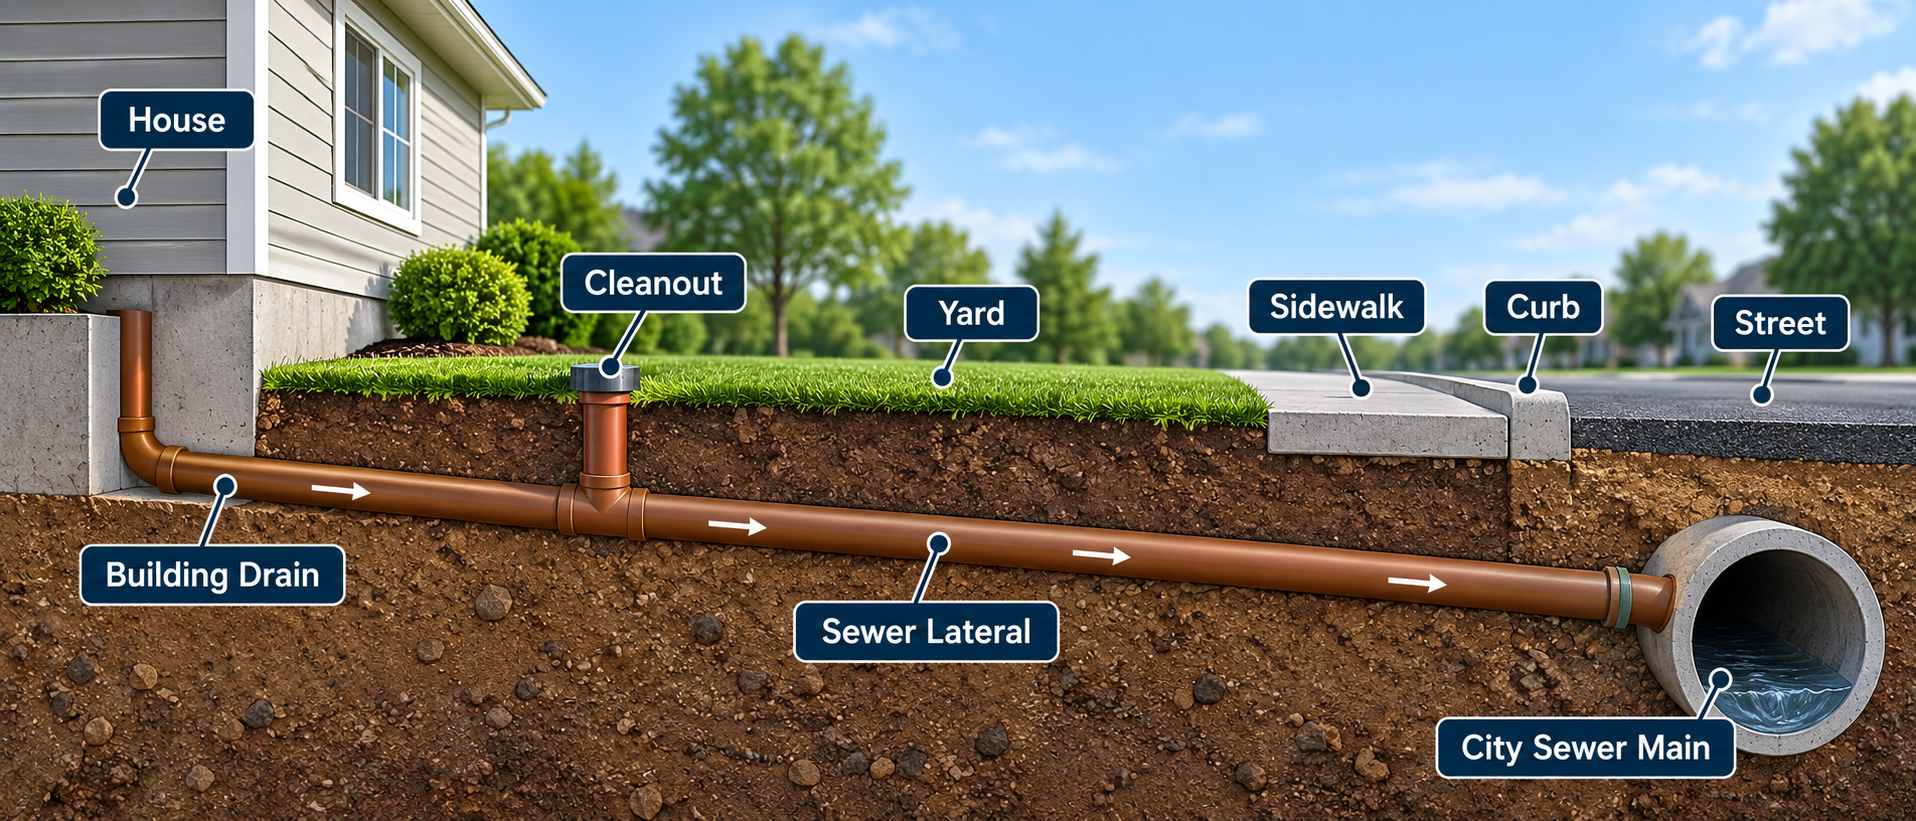
A sewer scope (also called a sewer camera inspection or sewer line video inspection) is a video check of the pipe that carries wastewater from your house to the city sewer main or septic system. A technician feeds a waterproof camera on a flexible cable through a cleanout and records what it sees.
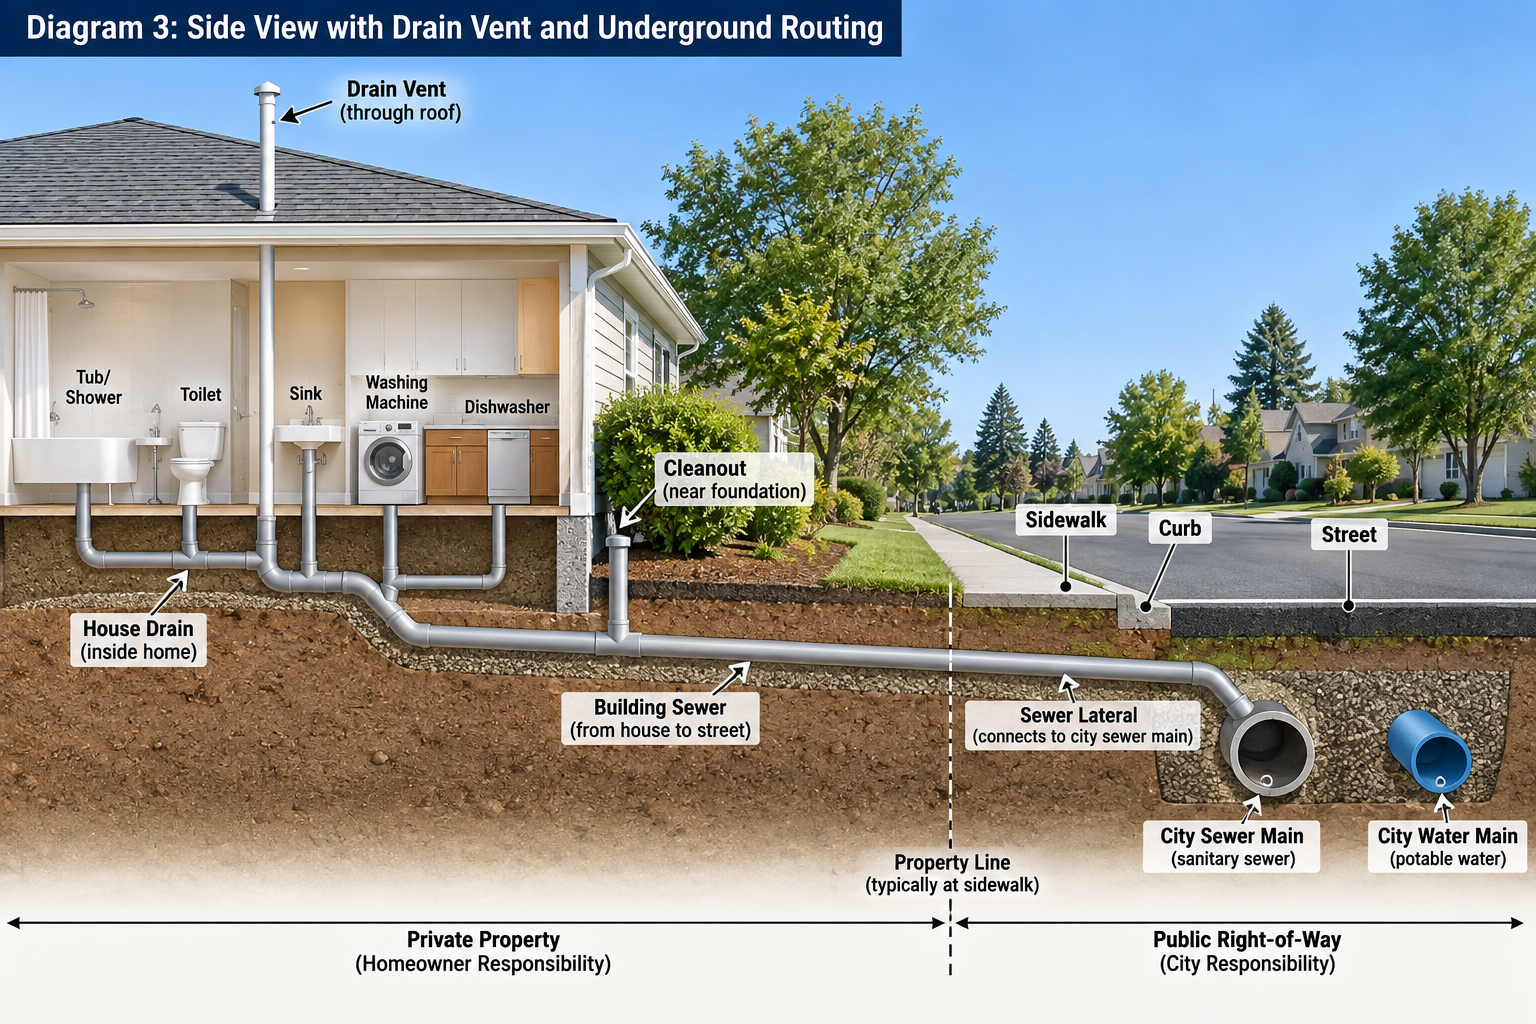
Side view of a home illustrating the sewer line connections.
It can reveal:
• Cracked, broken, or separated pipe
• Tree roots growing into joints
• Bellies, which are sags where waste and water collect
• Crushed or collapsed sections
• Deteriorating clay, cast iron, or Orangeburg (tar paper) pipe
• Heavy buildup or blockages
Is it part of a home inspection?
Usually not. Industry standards treat the buried sewer line as outside the scope of a typical home inspection, so it's a separate service you have to request. Not every inspector offers it, which we'll cover in the next post.
What does it cost?
Most published 2026 guides put a sewer scope at roughly $125 to $500 when there's an accessible cleanout, and often $100 to $250 when it's added to a home inspection. That's a small line item compared to what it can uncover.
Who should consider one?
• Homes more than about 20 to 30 years old
• Properties with mature trees near the sewer line
• Homes with older clay, cast iron, or Orangeburg pipe
• Homes with slow drains, gurgling, odors, or unusually wet or green patches in the yard
• Any home without a record of a recent scope, especially when nobody can vouch for its history
• Anyone who may sell someday. Knowing early gives you choices, instead of a surprise in the middle of a sale
Quick facts
What it is
A camera inspection of the main sewer line from your house to the street or septic system
How long it takes
Usually under an hour
Typical cost
About $125 to $500, or $100 to $250 as an add-on to a home inspection
In a standard home inspection?
Usually not. It is a separate service you request
Ask for
The video and a written report
Next in this series
• Post 2: Who Can Scope Your Sewer Line, an Inspector or a Plumber?
• Post 3: The Sewer Scope Found a Problem. Costs and Your Options
If something turns up, we can help
Hopefully you'll never need to reline or replace a sewer line. For most homeowners, it's a once-in-a-lifetime event. For us, as agents, it isn't. We see situations like this and have experience helping people through them.
We work with contractors, suppliers, and vendors regularly. We can't recommend specific companies, but we can help you work out what kind of professional you need, what questions to ask, and how to compare bids, so you find the right fit for your situation.
Whether you're selling soon or someday, we're glad to be a resource.
Kelly Azzarello Real Estate | Compass
kelly@kellyazzarello.com | (425) 830-6457 | www.kellyazzarello.com
[YouTube placeholder: link to video]
Cost ranges are general estimates drawn from published 2026 cost guides and vary by property, region, and contractor. This post is general information, not legal advice.

Out of Sight, Out of Mind, Out of Pocket
Have you ever been surprised by a hidden issue in your house? Maybe on that cost you thousands of dollars?
The hidden home problems worth knowing about now, so selling your home later doesn't come with a surprise bill
Here's something we hear a lot: "Everything works, so we're good."
But a toilet that flushes tells you very little about the sewer line underground, and a light that turns on tells you nothing about the panel behind the wall.
The most expensive surprises in a home are usually the ones nobody can see.
And they rarely pick a convenient time. A problem that surfaces in the middle of a sale usually costs more, takes more time, and leaves you with fewer choices than one you found and handled on your own schedule. A buyer's inspector will find it either way. The only question is whether you find it first.
This series walks through the hidden problems one at a time, short and plain, so you can find out what's there, what it might cost, and what to do about it. Whether you plan to sell soon, someday, or never, a little attention now keeps small things small.

How to use this guide
Pick the topic that matches what you're wondering about and jump in. Each post takes only a few minutes to read. Not sure where to start? Begin with the first section below. Those are the hardest problems to see, which is why they tend to surprise people most.
Hidden underground and behind the walls
• Sewer lines and older plumbing (including CPVC): Why a working toilet doesn't mean a healthy pipe, and what to know about CPVC.
• Electrical panel and wiring: Older panels and wiring can worry buyers, lenders, and insurers.
• Buried oil tanks: A tank left in the yard can complicate financing and cost real money to deal with.
• Asbestos (popcorn ceilings and more): What it is, where it hides, and why you shouldn't scrape to find out.
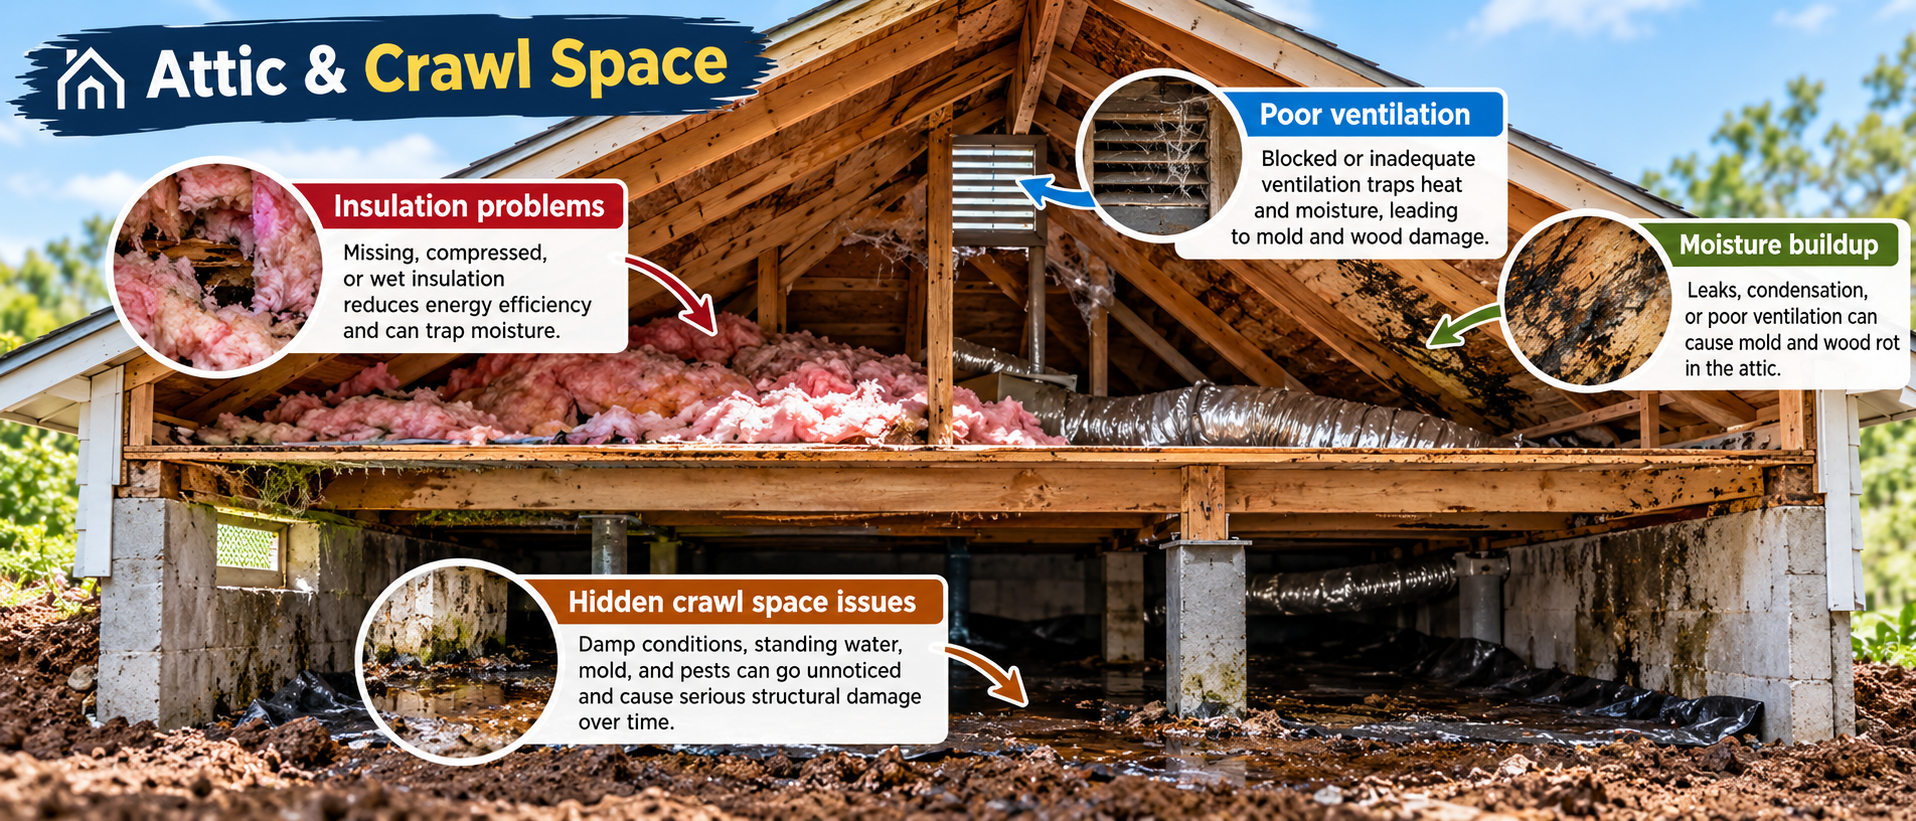
• The crawl space and attic nobody has checked in years: Moisture, pests, and insulation problems that build quietly.
• Pests and wood rot: Damage inside walls and beams that shows up on an inspection report.
Big-ticket items that age out
• Roof age and condition: What an aging roof tells a buyer's inspector, and what it tells you.
• Water heater age: A five-minute check that can save you a flooded utility room.
• Broken windows and failed seals: Fogging, condensation, and windows that won't open or close.
• Deferred exterior maintenance: Small things that invite bigger problems.
What buyers notice the moment they walk in
• Odors: Pet, smoke, and cooking smells that settle into carpet, ducts, and insulation.
• Highly stylized paint or decor: Bold choices that can narrow your buyer pool.
The paperwork side
• Unpermitted work: The paperwork problem that can stall a closing.
• Should you inspect before you sell? Pre-sale inspections and disclosure basics.
• Which add-on inspections are worth ordering? Sewer scope, pest, chimney, and more, and when each makes sense.
Why finding out early matters
When a hidden problem shows up at the last minute, everyone is learning about it at the same time, and that's when it gets stressful. Problems found early, with real estimates in hand, are much easier to work through. You choose the contractor, the timing, and the budget, instead of being backed into a corner.
If something turns up, we can help
Most homeowners deal with a problem like these once in a lifetime, if ever. Hopefully you'll never need to reline a sewer line, replace a panel, or dig up a buried tank. If you do, it helps to have someone who has been through it before.
As agents, we work with contractors, suppliers, and vendors all the time, and we've helped clients through situations like these. We can't recommend specific companies, but we can help you work out what kind of professional you need, what questions to ask, and how to compare bids, so you find the right fit for your situation.
Whether you're selling soon, someday, or not at all, we're glad to be a resource.
Kelly Azzarello Real Estate | Compass
kelly@kellyazzarello.com | (425) 830-6457 | www.kellyazzarello.com
This series is general information, not legal or financial advice. Disclosure rules and licensing requirements differ by state.
Out of Sight series banner.
Want to sell? Don’t miss out on a hidden gem: hardwoods under the carpet
If your home was built in the 1970's or earlier, which is not uncommon in established neighborhoods in Bellevue, Sammamish, Redmond, Issaquah, and Renton, there's a decent chance real hardwood is hiding under that living room carpet. Even if you're not sure what's under that carpet, it's a good idea to check it out before spending thousands replacing worn carpet when the better, and maybe even cheaper, move is right underneath your feet.
How to Check Before You Commit to Anything
Before you order new carpet or call a flooring crew, pull up a corner in a closet or under a heat register — anywhere the seam won't be seen if you decide to keep the carpet after all. You're looking for solid wood strip flooring, which shows up in all kinds of homes, sometimes in surprising places.
If you find it, a light sand and refinish typically runs a fraction of the cost of new carpet or engineered flooring, and buyers consistently respond to real hardwood in listing photos.
Why This Is Worth the Effort
Buyers touring homes for sale in Bellevue, Sammamish, Redmond, Issaquah, Renton, and Klahanie expect a certain level of finish, and original hardwood flooring signals quality and character that builder-grade flooring can't fake. It's one of the few updates where the “before” condition of the house actually works in your favor. This is especially true if the house has the charm of a craftsman or mid-century modern build — a style you'll find throughout many of these Eastside neighborhoods. Make certain you speak to your broker before doing anything though, as brokers like us have contacts and experience to help guide you through.
What It Costs vs. What It's Worth
A professional hardwood floor refinishing job is generally priced per square foot and is almost always less expensive than replacing flooring outright — and it photographs beautifully for real estate listing marketing.
One of the first questions sellers across Bellevue, Sammamish, Redmond, Issaquah, Renton, and Klahanie ask us about refinishing their hardwoods is whether they'll get their money back; the ever-present ROI debate. There's no easy answer to this, and there are many things that go into making this decision. In our experience helping local sellers get their homes ready to sell, ROI on a project like this shows up in a few different ways:
1. Real return. This is the straightforward version: you put in $10,000 and the sale price increases by $10,000 — or $8,000, or $6,000. It's rarely a dollar-for-dollar trade, but it's the easiest to measure.
2. Attraction. This is where a project makes the home more appealing to buyers without necessarily attaching to a specific dollar amount. A more attractive home draws more interest, which can mean more showings, more offers, and a stronger negotiating position — even if you can't point to the exact number it added.
3. Detraction. This is the flip side: something about the home is unattractive enough that buyers notice it, and if you don't address it before listing, you're doing the home — and yourself — a disservice. It's not about adding value so much as it is about not losing it.
Sometimes you have the history of why the carpet was installed. If it was installed to hide poorly installed floors, or floors that were damaged (water, pets, etc.), you'll need to consider whether or not it's worth it to refinish, recarpet, or replace entirely.
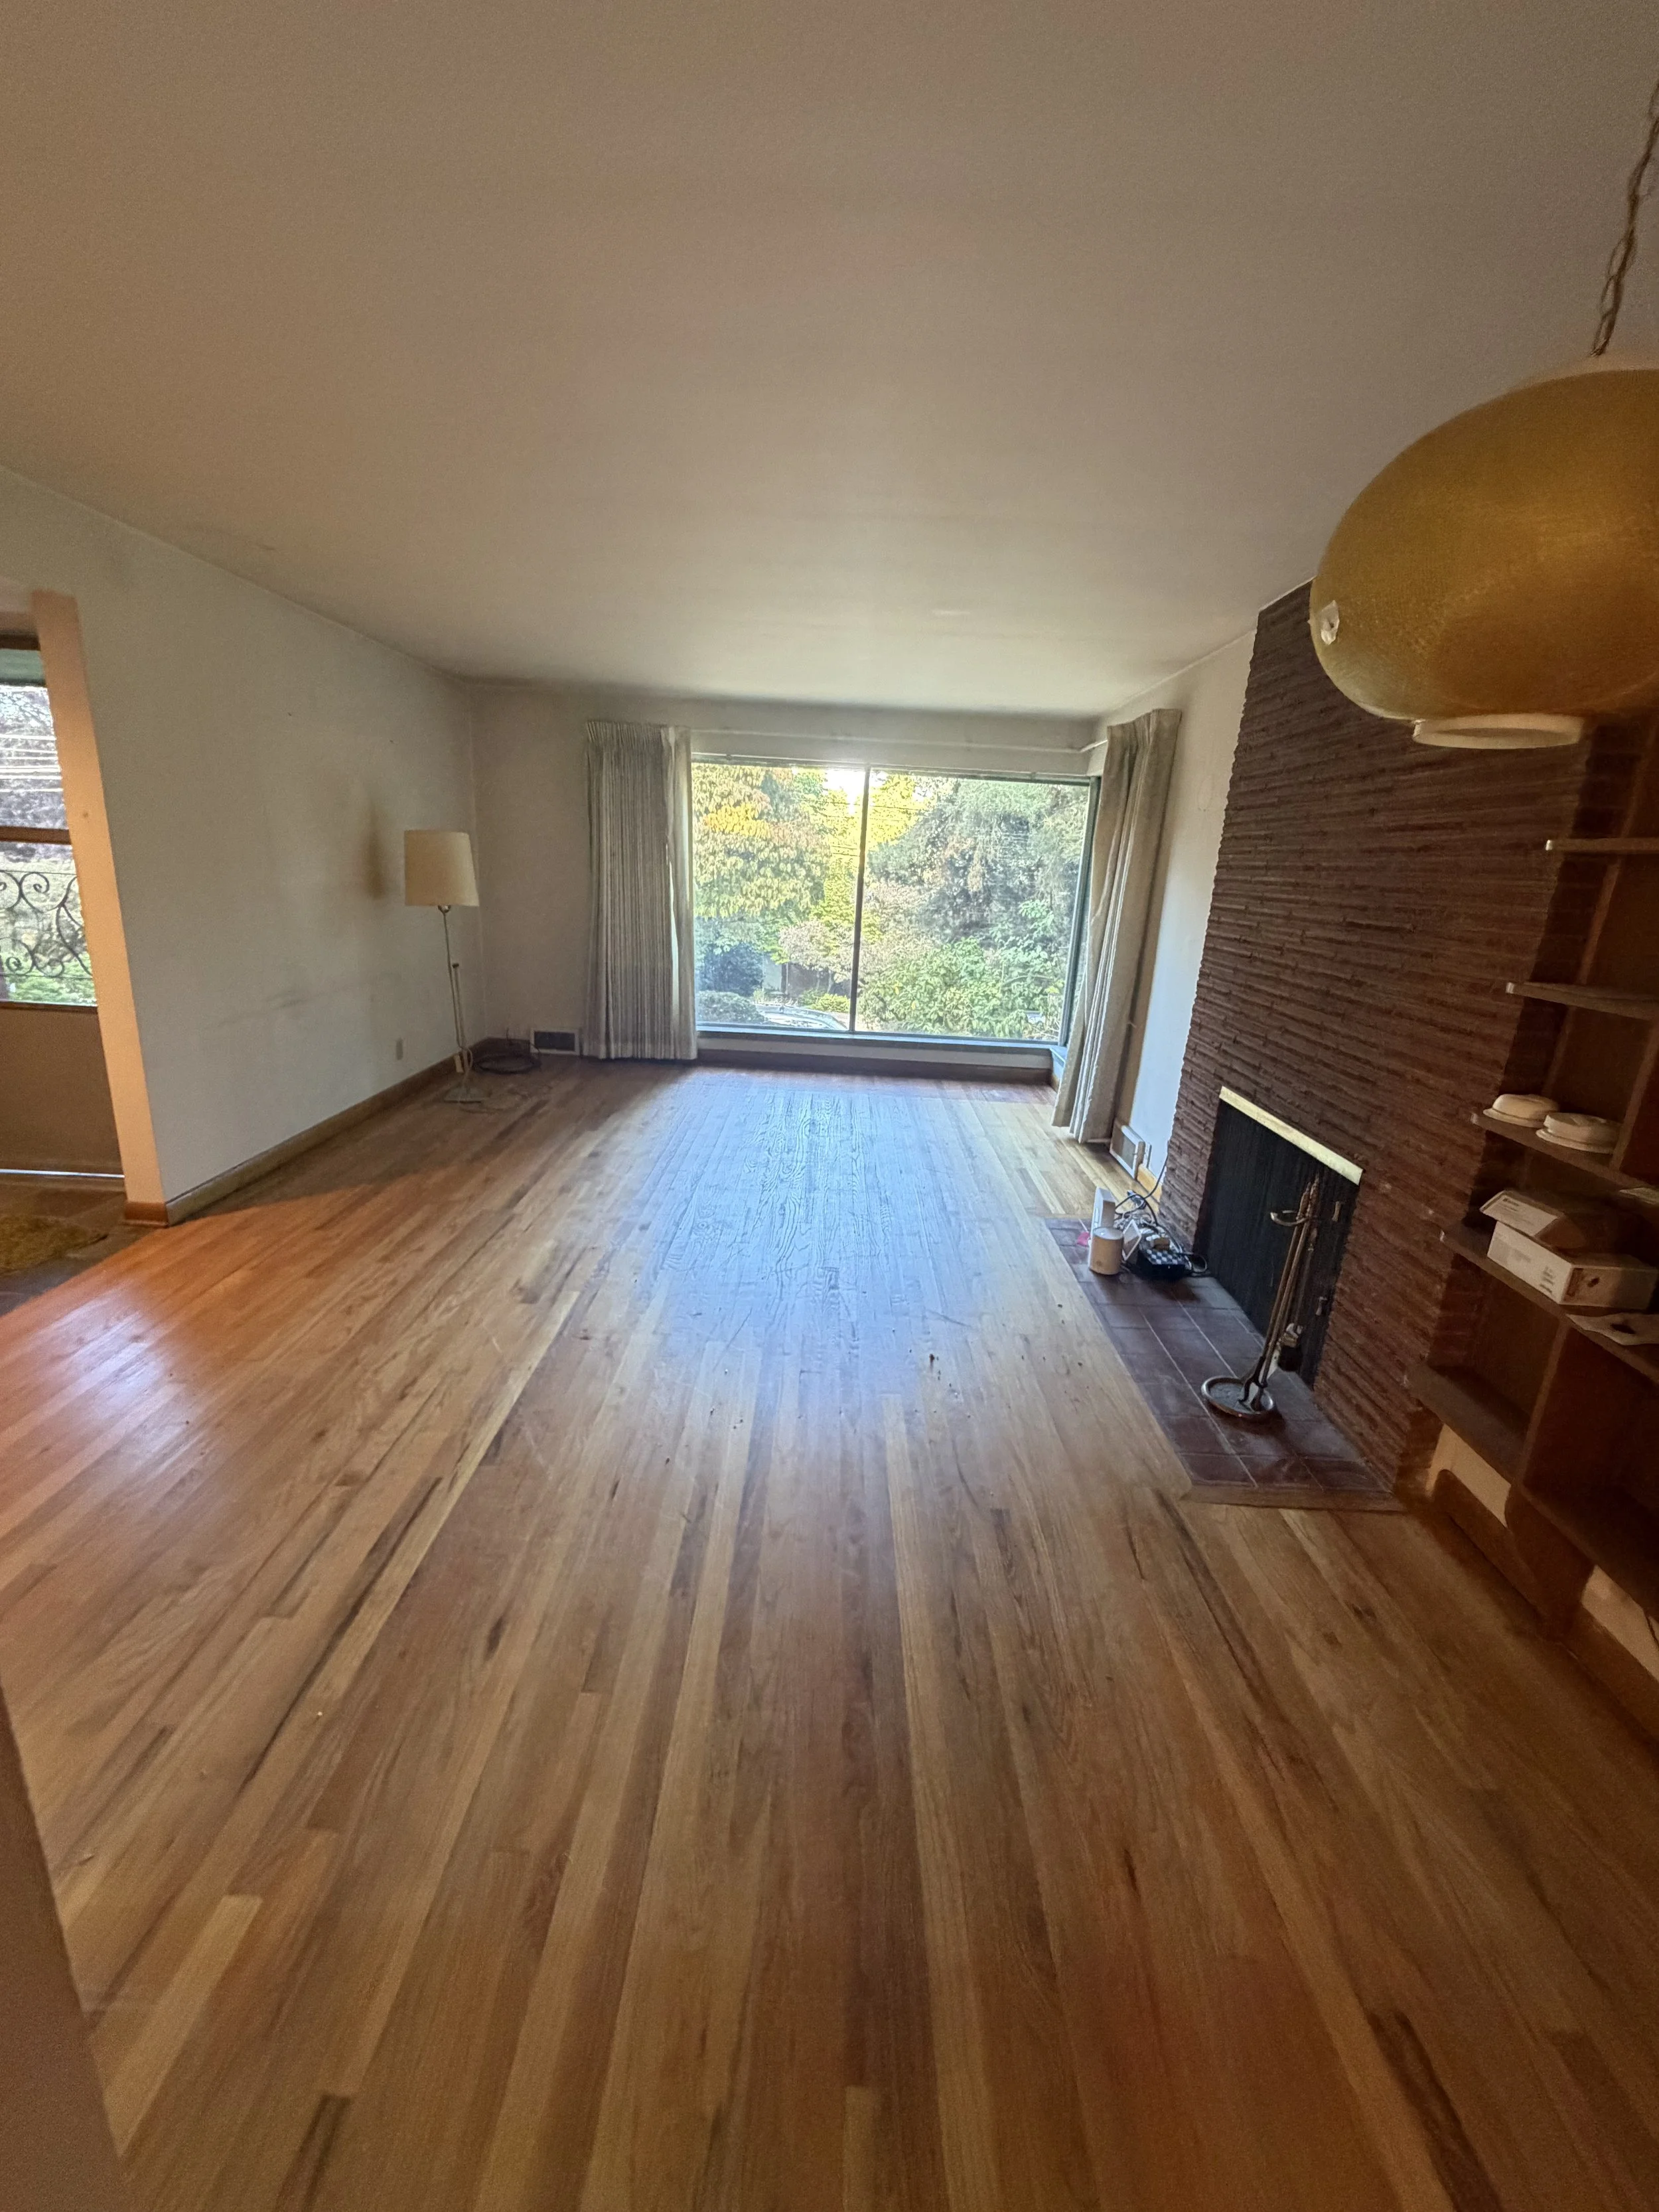
In our example below, that carpet was old, unattractive, musty, and worn — squarely in the “detraction” category. It had to go. Luckily, we discovered the hardwood beneath it was in great shape.
An Example From Our Own Experience
In a recent case for us, a client came to us with her parents' older home in the Eastside area. They had lived there for 50 years, and the carpet in the home today was there when they bought it. After 5 minutes of investigation we determined that the hardwoods were throughout the main floor of the house (with the exception of the kitchen) and they seemed to be in very good condition.
We recommended pulling up the carpet (which needed to be done anyway), and in this case decided that refinishing was not necessary. Why?
1. The hardwoods were in very good shape (no major stains, though some fading, no large scratches, etc.).
2. The color of the floors was fairly neutral, and refinishing, like painting, is very personal. Not only would the savings of not refinishing go to the sellers' bottom line, but buyers would refinish it the way they wanted and wouldn't be paying for someone else's “tastes” in color.
Here's the dining room before, still carpeted, and the same room after the carpet came up — no sanding, no refinishing, just the original floor underneath:

Before: the dining room, still carpeted

After: same dining room, original hardwood exposed

Living room, carpet pulled back mid-process
Living room after, hardwood fully exposed
It's worth saying plainly: at this point, there has been zero refinishing done to these floors. What you're seeing is simply the original hardwood, cleaned up, with the carpet and padding removed. It already looks great.
One detail worth knowing about: it's common with hardwood floors to have quarter round trim at the bottom of the baseboards. That quarter round is often removed when carpet is installed, since carpet gets tucked under the baseboard for a more finished look. In this case, we decided not to reinstall the quarter round — matching the existing trim exactly would have been difficult, and we expect the new owners will want to refinish the floors themselves, at which point they'll likely replace the quarter round to match whatever finish they choose.
We also didn't touch the flooring anywhere else in the house. The basement and kitchen both have rolled linoleum, and we left both as-is rather than expanding the scope of this project.
If a buyer's feedback mentions the floors needing refinishing, or the missing quarter round, our response is simple: “We discovered wonderful hardwoods below the old carpet and felt that buyers would appreciate them more than simply covering them up again. We didn't refinish them because we expected the buyers would want to pick the finishes themselves, and replace the quarter-round at that time as well as flooring in other areas of the house. We priced it with the fact that the buyer would want to refinish themselves, not pay the seller for that — especially if they wanted a different color or finish.”
While I wouldn't say it's easy to pull up carpet, tack strips, and staples in the flooring, it is definitely something that can be done by the seller or a handyman. You'll want to be careful not to mar the flooring during carpet removal, but it doesn't require a flooring professional, and YouTube will be your friend. You'll need a few tools and some way to get the old carpet and tack strips to the dump, but you'll likely find a use for the tools — maybe in your next home when you prepare to move in.
Even a partial refinish in the main living areas can be enough to shift buyer perception the moment they walk in.
Thinking About Selling Your Home in Bellevue, Sammamish, Redmond, Issaquah, Renton, or Klahanie?
Every home is different, and not every fix is worth the money. If you'd like a second set of eyes on what's actually worth doing before you list — and what to skip — we're happy to walk through it with you, room by room. We work with sellers throughout the Eastside and know what local buyers respond to.
Kelly Azzarello Real Estate | Compass Real Estate
📞 (425) 830-6457
🎥 Watch home-selling tips and Eastside market updates on our YouTube channel — [link coming soon]